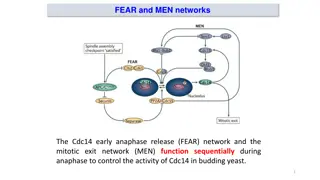
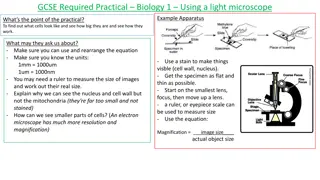
Investigating Dehydrogenase Activity Using Yeast
This investigation focuses on exploring respiration in yeast by tracking the breakdown of glucose using dehydrogenase enzymes. The experiment involves immobilizing yeast into gel balls and measuring the change in color of resazurin dye to quantify the rate of respiration. Safety measures, risk assessment, experimental stages, and skill development are all highlighted in the process.

Download Presentation

Please find below an Image/Link to download the presentation.
The content on the website is provided AS IS for your information and personal use only. It may not be sold, licensed, or shared on other websites without obtaining consent from the author. Download presentation by click this link. If you encounter any issues during the download, it is possible that the publisher has removed the file from their server.
E N D
Presentation Transcript
Investigating dehydrogenase activity, using yeast as a model organism.
Investigation Background This investigation focuses on respiration. During the breakdown of glucose, hydrogen ions are released through the action of dehydrogenase enzymes. The hydrogen ions are passed to the coenzyme NAD, forming NADH. In this experiment, we explore respiration in yeast. To track this reaction, we use a dye called resazurin. In the oxidised state, it is blue. However, it can pick up the hydrogen ions lost from glucose during its breakdown. When this happens, resazurin becomes reduced and changes colour. It changes through a series of colours, as shown below. This change in colour can be quantified using a colorimeter, which measures the absorbance of light by a solution. By monitoring the change in absorbance during a period of time, the rate of respiration can be determined. This investigation will explore respiration using the model organism, yeast (see right). Yeast will be immobilised to form gel balls (see left), which will then be added to reaction tubes with a respiratory substrate and the resazurin dye.
Skill Focus Look out for these symbols throughout this investigation. What skills are you developing?
Time to Plan Consider the questions below. The pinboard shows some variables that exist in this investigation. Once you have identified the dependent variable in this investigation, choose an independent variable. Then construct a table to detail all confounding variables (also called constant factors) and how you will keep these factors constant.
Time to Risk Assess Before you embark on any scientific investigation, it is important to understand the hazards involved and assess the risk of these hazards. What control measures should you have in place to protect the safety of yourself and others? What is the risk of harm associated with each hazard? What hazards are involved in this practical? What control measures should you put in place? Think about each of the chemicals involved in this investigation. Use the SSERC website, with support from your teacher, to determine the risk and control measures required. The materials are also hyperlinked to include the Safety Data Sheet to read more. Are these materials hazardous or not? Chemical Hazard Risk Control Measure Calcium chloride Yeast Resazurin dye
The Experiment Stage 1: Making immobilised yeast Materials: 3ml Sodium alginate 30ml Calcium chloride 3ml yeast solution 10ml Syringe barrel Bijou bottle 3ml Pipette Syringe Small beaker Tea strainer Stirring rod Clamp stand Step 1: Clamp the barrel of the syringe so that it is about 20cm above a glass beaker containing 30ml calcium chloride. Step 2: Gently shake the yeast to resuspend the solution. Add 3ml yeast to 3ml sodium alginate in a beaker. Mix well using the stirring rod.
The Experiment Stage 1: Making immobilised yeast Step 3: Pour the yeast/alginate mixture into the syringe barrel and gently swirl the small beaker of calcium chloride. As the mixture drops into the calcium chloride, each drop will form a bead. Once the syringe is empty, leave the newly formed beads for approximately 5 minutes. Step 4: Transfer the beads to the tea strainer and gently wash them with cold tap water. Rinse well with distilled water. Stage 2 of the investigation, running the dehydrogenase assay, follows on the next pages. This has been demonstrated with substrate concentration as the independent variable. Remember to adjust the protocol to reflect your independent variable.
The Experiment Stage 2: The Dehydrogenase Assay Investigating the effect of substrate concentration on respiration rate in yeast. Materials for your group: Yeast immobilised beads 1 test tube rack with 4 test tubes Marker pen Stopwatch Safety goggles Pasteur pipettes (3ml) or syringes Materials to share in class: 2.5% glucose solution 5% glucose solution 10% glucose solution Resazurin dye Water bath at 35 C Distilled water Step 1: Label 4 test tubes corresponding to the glucose concentration used. Step 2: Add 3ml resazurin dye to each tube, 3ml of the appropriate glucose solution to each tube and 15 immobilised yeast beads to each tube. Step 3: Place all test tubes in the water bath. They will stay here for 30 minutes, but measurements will be taken every 3 minutes for each reaction.
The Experiment Stage 2: The Dehydrogenase Assay Step 4: Set up the colorimeter as soon as the test tubes are in the water bath. Set the filter to 590nm. Add 3ml of a glucose solution to a cuvette and place in the colorimeter. Use this to blank the colorimeter. Step 5: Using a pipette, remove samples from each tube every 3 minutes and take colorimetric readings for 30 minutes, remembering to pour the solution back into the correct tube after each reading.
The Conclusions Refer back to your aim. What conclusion can you now draw? Evaluation Consider your protocol during this reflective period. Identify two limitations of the investigation and how you could minimise their impact if you were to repeat this in the future.