Accessing DEFMIS Hospital Portal and Patient Verification guide
Quickly access the DEFMIS Hospital's web portal, log in with your credentials, verify patients, create claims, and manage them effortlessly. Follow step-by-step instructions with images for a seamless user experience.
Download Presentation

Please find below an Image/Link to download the presentation.
The content on the website is provided AS IS for your information and personal use only. It may not be sold, licensed, or shared on other websites without obtaining consent from the author.If you encounter any issues during the download, it is possible that the publisher has removed the file from their server.
You are allowed to download the files provided on this website for personal or commercial use, subject to the condition that they are used lawfully. All files are the property of their respective owners.
The content on the website is provided AS IS for your information and personal use only. It may not be sold, licensed, or shared on other websites without obtaining consent from the author.
E N D
Presentation Transcript
DEFMIS HOSPITALS WEB DEFMIS HOSPITAL S WEB PORTAL PORTAL PRESENTATION
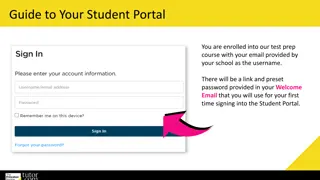
ACCESS TO THE PORTAL ACCESS TO THE PORTAL To access our portal use the following address; portal.defmis.org . This will directly lead you to the log in page as shown: You will be required to enter the USERNAME and PASSWORD. And click on SIGN IN or press ENTER key.
Authentication Authentication You will be required to validate your log in by sending a one time pin (otp/token) to your phone number by clicking the Send Token button Once you enter the token ,click the Validate token button. That s a successful authentication done.
HOME PAGE HOME PAGE On a successful log in the page below loads.
PATIENT VERIFICATION PATIENT VERIFICATION While on the homepage, click on Patient Verification(1) under the Quicklinks, Which leads to Patient verification page (2). 1 2 Enter Patients Member Number and Click on SEARCH
WHAT NEXT? WHAT NEXT? A successful search will load patient details (1), where you will be required to select the patients phone number and click Send Token button for him/her to receive the verification token. On successful validation the next page (2) loads. Where you scroll down and click on CREATE CLAIM. 1 2 Click here Click here
Claim successfully created. Claim successfully created. You have just created a new claim for our patient to be offered any of the following services. OUTPATIENT INPATIENT DENTAL OPTICAL
Where is the claim? Where is the claim? After clicking on create claim, a new claim will directly fall under the UNSUBMITTED CLAIMS, where you will have the privilegde of viewing, editing for submission, seeking pre-authorisation and deleting the unsubmitted claim(if it was created by mistake). VIEW EDIT PRE-AUTH DELETE
Why seek for a pre Why seek for a pre- -auth? auth? We seek for a pre-authorisation when: i. The outpatient bill will be more than Ksh 10,000(LOU) ii. The patient is seeking for Dental services(LOU) iii. The patient is seeking for Optical services(LOU) iv. The patient is seeking for Inpatient services that is admission request (Commitment Letter) and Discharge request(LOU)
Lets get it done.(Seek Pre Lets get it done.(Seek Pre- -Auth) Auth) Go to the list of un-submitted claims. Search by claim number or Patient s member number Click on Pre-Auth button.
Pre Pre- -auth Page Is Here: auth Page Is Here: Select and Fill in the information; attach the following documents as one file in PDF FORMAT: (i) Claim form, Pre-auth form- for Admission requests and Outpatient services when more than Ksh 10,000; Dental and Optical (ii) Claim form,Pre-Auth form, Itemized invoice ,Medical reports- for Discharge requests Upload the attachment by clicking on the upload button. You will be required to SAVE before you SUBMIT.
Our healthcare department will immediately receive the Pre-Auth request and shortly you be able to download the approved pre- authorisation either as; i. Commitment Letter- for Inpatient(Admission requests) only. ii. LOU For outpatient services, Dental ,Optical and Inpatient (Discharge Request). NB: FOR INPATIENT BOTH CASES APPLY For any corrections on your side the Pre-auth will be retuned.
Where are the APPROVED, RETURNED pre Where are the APPROVED, RETURNED pre- - auths auths? ? Unsubmitted Saved but not Submitted. Submitted- Submitted to DEFMIS pending approval. Approved-Approved and you can download in pdf format. Returned At your desk for some reasons, for corrections. Rejected Declared unpayable. NOTE: FOR ANY INFORMATION ON PRE-AUTH CALL 0725000056 / 0725000057
CLEAR THE PATIENT. CLEAR THE PATIENT. Why clear the patient? i. So that we can submit the claim. ii. So that the patient can get services in any other DEFMIS ACCREDITED FACILITY. On the home page ; click on clear patient.
Clearing the patient Clearing the patient Search the patient using the member number (1), An uncleared visit will be displayed as shown (2). click on click here to clear patient (2) 1 2
Reminded to clear the patient using the total Reminded to clear the patient using the total invoice value invoice value: WHY? WHY? If you update a lesser invoice value the claim will not be submitted , instead the following error will be displayed: Ammount exceeds total declared when clearing patient . SO YOU MUST USE THE TOTAL INVOICE VALUE INCLUSIVE OF COPAY Input the total invoice value and click on UPDATE CHOOSE the number to receive the clearance token and click Send Token Click Validate Token once the patient receives the token The patient is cleared and will receive SMS.
SUBMITTING THE CLAIM TO DEFMIS. SUBMITTING THE CLAIM TO DEFMIS. Under unsubmitted claims , click on the EDIT icon as shown; EDIT
SUBMITTING THE CLAIM TO DEFMIS CONT SUBMITTING THE CLAIM TO DEFMIS CONT i. Choose the visit type ii. Discharge condition iii. Enter the illness/Diagnosis iv. Enter the treatment procedures and costs(as per the invoice) v. Choose the attachments and upload NB: Its advised you choose the attachment name to be ALL COMBINED then attach all the documents as one file(one document with more than one page)
SUBMITTING THE CLAIM TO DEFMIS CONT SUBMITTING THE CLAIM TO DEFMIS CONT Once you have clicked on upload pdf attachment , PROCEED to click on SAVE button . Please check through your saved claim to ensure that all fields are well captured and then CLICK on SUBMIT button. YOU HAVE SUBMITTED YOUR CLAIM TO DEFMIS.
POINTS TO NOTE POINTS TO NOTE To submit a claim , you MUST clear the patient first. Do not attach the NATIONAL AND DEFMIS MEDICAL CARDS when submitting a claim or a pre-auth request
Statuses of the claims Statuses of the claims Unsubmitted- not yet submitted to DEFMIS. Submitted- Sent to DEFMIS awaiting approval. Approved- paid/ready for payment. Returned- returned to facility for corrections. Rejected- need reconciliation.
USER MANAGEMENT USER MANAGEMENT In this portal , we have an administrative user at the hospital level who can create user accounts and activate them , when a facility acquires a new user. At the top right corner in our homepage Click on the username displayed under the Hospital name. Select add user.
Creating a user account Creating a user account. Enter all the details and click on Sign up below
Activating the user Activating the user Once you have created the user, you will have to activate the user for him or her to log in to the portal . Go to USERS and click on ACTIVATE on the user created
DEFMIS CONTACTS MEDICAL DEPT: 0725000056/0725000057 ICT DEPT: 0793531197/0793666333 CARD ISSUANCE: 0202340489 REGISTRY: 0793531189
