Acid-Base Titration Practice Handout with Burettes
Practice using burettes for acid-base titration to determine the molarity of a base solution. Follow steps, use phenolphthalein indicator, and calculate the base molarity from titration results with proper significant figures.

Download Presentation

Please find below an Image/Link to download the presentation.
The content on the website is provided AS IS for your information and personal use only. It may not be sold, licensed, or shared on other websites without obtaining consent from the author. If you encounter any issues during the download, it is possible that the publisher has removed the file from their server.
You are allowed to download the files provided on this website for personal or commercial use, subject to the condition that they are used lawfully. All files are the property of their respective owners.
The content on the website is provided AS IS for your information and personal use only. It may not be sold, licensed, or shared on other websites without obtaining consent from the author.
E N D
Presentation Transcript
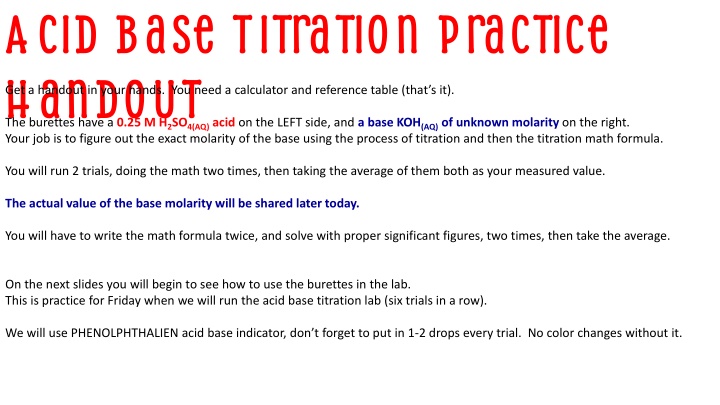
Acid Base Titration Practice Handout The burettes have a 0.25 M H2SO4(AQ) acid on the LEFT side, and a base KOH(AQ) of unknown molarity on the right. Your job is to figure out the exact molarity of the base using the process of titration and then the titration math formula. Get a handout in your hands. You need a calculator and reference table (that s it). You will run 2 trials, doing the math two times, then taking the average of them both as your measured value. The actual value of the base molarity will be shared later today. You will have to write the math formula twice, and solve with proper significant figures, two times, then take the average. On the next slides you will begin to see how to use the burettes in the lab. This is practice for Friday when we will run the acid base titration lab (six trials in a row). We will use PHENOLPHTHALIEN acid base indicator, don t forget to put in 1-2 drops every trial. No color changes without it.
The color difference between acid and base is for illustration only, both are clear. Acid Base Start point Nearest 10th mL Acid will always be on the left side. The valves are very fine, and release the tiniest of droplets, making careful measurements possible. Start point Nearest 10th mL There are A LOT of lines on the burettes. They start at ZERO on top, and end with 50.0 mL at the bottom. Carefully measure your start points, which will hardly ever be at 0.0 or even 10.0 mL. Measure your start points always, and your end points WHEN YOU ARE REALLY DONE
Run about 5-6 mL of acid into your clean reaction beaker. Don t worry so much about how much acid, just make sure it runs down about 5 mL for now. Acid Base Start point Nearest 10th mL ~ 5 mL We will make a few adjustments, adding more acid, so don t fret over the end point, we have not gotten to the end yet. Start point Nearest 10th mL
Put ONE DROP OF phenolphthalein indicator in now. Acid Base Start point Nearest 10th mL Start point Nearest 10th mL More is not better; one drop is enough.
Slowly put some base into the beaker, do not miss a single drop! Acid Base Start point Nearest 10th mL Each drop should show up as a PINK burst, which disappears when you swirl the beaker. Start point Nearest 10th mL As the base goes into solution, the acid is neutralizing and at some point it is neutralized, and then, at pH of 8.0 the pink begins to show up. Add base until solution is hot pink. Make sure the valves are parallel to the tables, OFF! Do not worry about measuring the END POINTS in the burettes, we have NOT ended yet.
Bring PINK solution back to the acid side, and put in one drop at a time. SLOWLY. Acid Base Start point Nearest 10th mL When the solution is clear STOP! Start point Nearest 10th mL End point Nearest 10th mL
Then bring it back to the base side, and put in ONE DROP at a time. Acid Base Start point Nearest 10th mL When ONE DROP turns it light pink, you are done. Start point Nearest 10th mL Measure the FINAL end points now. End point Nearest 10th mL Rinse beaker. End point Nearest 10th mL Time for math. Write formula. Put in numbers for all variables, solve for MB
For second trial, the old end points are the new start points. Acid Base Run out some acid, ONE mL MORE than you used in the previous trial. We want to use different measures don t do the math with 4.7 mL two times in a row. End point Is new start point End point Is new start point In reality that is okay, but different numbers will still be better for your understanding. Repeat the process. Do not forget the indicator. (or else) Do math again, do the average, then do the handout and put into the in box today.