CASE DV45CC Tier 4A (interim) Combination Roller Service Repair Manual Instant Download
CASE DV45CC Tier 4A (interim) Combination Roller Service Repair Manual Instant Download

Download Presentation

Please find below an Image/Link to download the presentation.
The content on the website is provided AS IS for your information and personal use only. It may not be sold, licensed, or shared on other websites without obtaining consent from the author. If you encounter any issues during the download, it is possible that the publisher has removed the file from their server.
You are allowed to download the files provided on this website for personal or commercial use, subject to the condition that they are used lawfully. All files are the property of their respective owners.
The content on the website is provided AS IS for your information and personal use only. It may not be sold, licensed, or shared on other websites without obtaining consent from the author.
E N D
Presentation Transcript
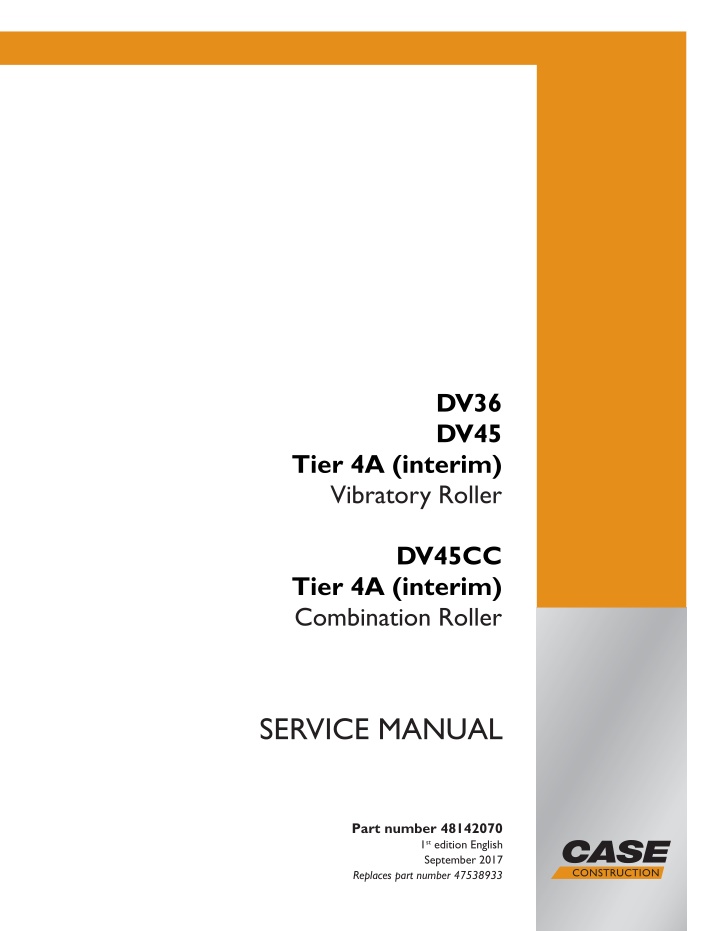
DV36 DV45 Tier 4A (interim) Vibratory Roller DV45CC Tier 4A (interim) Combination Roller SERVICE MANUAL Part number 48142070 1st edition English September 2017 Replaces part number 47538933 Printed in U.S.A. 2017 CNH Industrial America LLC. All Rights Reserved. Case is a trademark registered in the United States and many other countries, owned or licensed to CNH Industrial N.V., its subsidiaries or affiliates.
Contents INTRODUCTION Maintenance .............................................................................. 00 [00.150] Start-up............................................................................. 00.1 Engine....................................................................................... 10 [10.001] Engine and crankcase ............................................................. 10.1 [10.400] Engine cooling system ............................................................. 10.2 Hydrostatic drive......................................................................... 29 [29.218] Pump and motor components...................................................... 29.1 Brakes and controls .................................................................... 33 [33.110] Parking brake or parking lock ...................................................... 33.1 [33.202] Hydraulic service brakes ........................................................... 33.2 Hydraulic systems....................................................................... 35 [35.104] Fixed displacement pump.......................................................... 35.1 [35.000] Hydraulic systems.................................................................. 35.2 [35.102] Pump control valves................................................................ 35.3 [35.353] Hydraulic travel system ............................................................ 35.4 [35.300] Reservoir, cooler, and filters........................................................ 35.5 [35.995] Compaction/vibration hydraulic system ............................................ 35.6 Frames and ballasting................................................................. 39 [39.100] Frame .............................................................................. 39.1 Steering..................................................................................... 41 [41.101] Steering control .................................................................... 41.1 Wheels...................................................................................... 44 [44.160] Compaction drums ................................................................. 44.1 Electrical systems....................................................................... 55 [55.031] Parking brake electrical system.................................................... 55.1 48142070 15/09/2017
[55.000] Electrical system ................................................................... 55.2 [55.019] Hydrostatic drive control system ................................................... 55.3 [55.100] Harnesses and connectors......................................................... 55.4 [55.408] Warning indicators, alarms, and instruments ...................................... 55.5 [55.512] Cab controls........................................................................ 55.6 [55.640] Electronic modules................................................................. 55.7 [55.404] External lighting .................................................................... 55.8 [55.DTC] FAULT CODES.................................................................... 55.9 Tools......................................................................................... 89 [89.165] Water kit............................................................................ 89.1 Platform, cab, bodywork, and decals............................................. 90 [90.100] Engine hood and panels ........................................................... 90.1 [90.110] Operator platform less cab ......................................................... 90.2 48142070 15/09/2017
https://www.ebooklibonline.com Hello dear friend! Thank you very much for reading. Enter the link into your browser. The full manual is available for immediate download. https://www.ebooklibonline.com
INTRODUCTION 48142070 15/09/2017 1
INTRODUCTION Safety rules Personal safety This is the safety alert symbol. It is used to alert you to potential personal injury hazards. Obey all safety messages that follow this symbol to avoid possible death or injury. Throughout this manual you will find the signal words DANGER, WARNING, and CAUTION followed by special in- structions. These precautions are intended for the personal safety of you and those working with you. Read and understand all the safety messages in this manual before you operate or service the machine. DANGER indicates a hazardous situation that, if not avoided, will result in death or serious injury. WARNING indicates a hazardous situation that, if not avoided, could result in death or serious injury. CAUTION indicates a hazardous situation that, if not avoided, could result in minor or moderate injury. FAILURE TO FOLLOW DANGER, WARNING, AND CAUTION MESSAGES COULD RESULT IN DEATH OR SERIOUS INJURY. Machine safety NOTICE: Notice indicates a situation that, if not avoided, could result in machine or property damage. Throughout this manual you will find the signal word Notice followed by special instructions to prevent machine or property damage. The word Notice is used to address practices not related to personal safety. Information NOTE: Note indicates additional information that clarifies steps, procedures, or other information in this manual. Throughout this manual you will find the word Note followed by additional information about a step, procedure, or other information in the manual. The word Note is not intended to address personal safety or property damage. 48142070 15/09/2017 3
INTRODUCTION Safety rules - Ecology and the environment When legislation does not yet rule the treatment of some of the substances required by advanced technology, sound judgment should govern the use and disposal of products of a chemical and petrochemical nature. NOTE: The following are recommendations that may be of assistance: Become acquainted with and ensure that you understand the relative legislation applicable to your country. Where no legislation exists, obtain information from suppliers of oils, filters, batteries, fuels, antifreeze, cleaning agents, etc., with regard to their effect on man and nature and how to safely store, use, and dispose of these substances. Helpful hints Avoid filling tanks using cans or inappropriate pressurized fuel delivery systems that may cause considerable spillage. In general, avoid skin contact with all fuels, oils, acids, solvents, etc. Most of them contain substances that may be harmful to your health. Modern oils contain additives. Do not burn contaminated fuels and or waste oils in ordinary heating systems. Avoid spillage when draining off used engine coolant mixtures, engine, gearbox and hydraulic oils, brake fluids, etc. Do not mix drained brake fluids or fuels with lubricants. Store them safely until they can be disposed of in a proper way to comply with local legislation and available resources. Modern coolant mixtures, i.e. antifreeze and other additives, should be replaced every two years. They should not be allowed to get into the soil, but should be collected and disposed of properly. Repair any leaks or defects in the engine cooling or hydraulic system immediately. Do not increase the pressure in a pressurized circuit as this may lead to a component failure. Protect hoses during welding as penetrating weld splatter may burn a hole or weaken them, allowing the loss of oils, coolant, etc. 48142070 15/09/2017 4
INTRODUCTION Safety rules - Shop and assembly O-ring seals Lubricate the O-ring seals before you insert them in the seats. This will prevent the O-ring seals from overturning and twisting, which would jeopardize sealing efficiency. Sealing compounds Apply a sealing compound on the mating surfaces when specified by the procedure. Before you apply the sealing compound, prepare the surfaces as directed by the product container. Spare parts Only use CNH Original Parts. Only genuine spare parts guarantee the same quality, duration, and safety as original parts, as they are the same parts that are assembled during standard production. Only CNH Original Parts can offer this guarantee. When ordering spare parts, always provide the following information: Machine model (commercial name) and Product Identification Number (PIN) Part number of the ordered part, which can be found in the parts catalog 48142070 15/09/2017 5
SERVICE MANUAL Engine DV36 DV45CC DV45 48142070 15/09/2017 10
Engine - Engine and crankcase Engine - Adjust 1. Put the machine on two large or four small old tires or on a suitably soft base. 1 SVIL13COM0520AB 2. Move the speed lever to the highest setting: 100% = Fast speed = Reference value of 2360 2400 RPM NOTICE: Do not exceed the maximum engine speed of 2400 RPM! 2 SVIL13COM0498AB 3. Switch on front and rear vibration. 4. Use a tachometer to measure the frequency. NOTE: Source the tachometer locally. 3 SVIL13COM0058AB 5. If necessary, adjust the speed on the cable knuckle (1). 6. Tighten the nuts. 7. Check the fastening (2) on the ball head. 4 SVIL13COM0057AB 48142070 15/09/2017 10.1 [10.001] / 4
Engine - Engine and crankcase Engine RPM At the beginning 2410 2450 RPM 3230 3330 RPM 3000 3300 RPM 2650 2950 RPM 2500 2800 RPM Hz After 60 min 2360 2400 RPM 3230 3330 RPM 3000 3300 RPM 2650 2950 RPM 2430 2730 RPM Engine RPM, 100% Simple vibration speed, front Double vibration, front Double vibration, rear Double vibration, low frequency / small amplitude front Double vibration, low frequency / small amplitude rear Double vibration, low frequency / large amplitude front Double vibration, low frequency / large amplitude rear Engine RPM under load (driving and double vibration) 54 52 46 43 1900 2200 RPM 1900 2200 RPM 34 2050 2350 RPM 2200 2500 RPM 39 2500 2800 RPM 2430 2730 RPM 43 2385 2435 RPM 2345 2395 RPM Pressures At the beginning 70 110 bar (1015 1595 psi) 50 90 bar (725 1305 psi) After 60 min 70 110 bar (1015 1595 psi) 37 53 bar (536 768 psi) 65 85 bar (942 1232 psi) Pressures during MA and MB driving operation Pressures for vibratory operation, front Pressures for vibratory operation, front and rear 110 170 bar (1595 2465 psi) 52 68 bar (754 986 psi) 57 73 bar (826 1058 psi) Double vibration, low frequency / small amplitude Double vibration, low frequency / large amplitude 48142070 15/09/2017 10.1 [10.001] / 5
Engine - Engine and crankcase Engine - Remove DANGER Heavy objects! Lift and handle all heavy components using lifting equipment with adequate capacity. Always support units or parts with suitable slings or hooks. Make sure the work area is clear of all bystanders. Failure to comply will result in death or serious injury. D0076A 1. Support the hood with a suitable lifting device. 2. Disconnect the lamps (1). 3. Disconnect the hood strut (2). 4. Remove the bolts (3) on the hood hinge. 5. Repeat steps 2 4 on the opposite side. 1 RAIL13SSL0079BA 6. Disconnect the intake snorkel (1). 7. Disconnect the air box snorkel (2). 2 RAIL13SSL0159BA 8. Remove the air box. 3 RAIL13SSL0158BA 48142070 15/09/2017 10.1 [10.001] / 6
Engine - Engine and crankcase 9. Disconnect the electrical connector (1) for the injection pump solenoid. 10. Disconnect the glow plug wire (2). 4 RAIL13SSL0161BA 11. Remove the P-clamps (1) that retain the engine har- ness. 5 RAIL13SSL0160BA 12. Record the position of the throttle cable. Loosen the jam nut (1), and slide the throttle cable away from the mounting bracket. 13. Disconnect the throttle cable (2) from the injection pump. 6 RAIL13SSL0170BA 48142070 15/09/2017 10.1 [10.001] / 7
Engine - Engine and crankcase 14. Disconnect the wire (1) for the oil pressure sender. 15. Disconnect the electrical connector (2) for the fuel pump. 16. Disconnect and cap the drain hose (3) for the oil pan. 17. Disconnect and cap the fuel feed hose (4). 7 RAIL13SSL0169BA 18. Disconnect the wire (1) on the coolant temperature sensor. 8 RAIL13SSL0164BA 19. Disconnect and cap the fuel return line (1). 9 RAIL13SSL0156BA 48142070 15/09/2017 10.1 [10.001] / 8
Engine - Engine and crankcase 20. Remove the U-bolt (1). 10 RAIL13SSL0163BA 21. Disconnect and remove the muffler. 11 RAIL13SSL0157BA 22. Disconnect the negative battery cable (1) and the pos- itive battery cable (2). 12 RAIL13SSL0172BA 48142070 15/09/2017 10.1 [10.001] / 9
Engine - Engine and crankcase 23. Remove the battery hold-down assembly (1). 24. Remove the battery. 13 RAIL13SSL0173BA 25. Remove the battery tray hardware (1). 26. Remove the battery tray. 14 RAIL13SSL0171BA 27. Disconnect the battery wire (1) on the alternator. 28. Disconnect the regulator connector (2) on the alterna- tor. 29. Disconnect the battery cable (3) on the starter. 30. Disconnect the starter ignition wire (4). 31. Disconnect the ground cable (5). 15 RAIL13SSL0162BA 48142070 15/09/2017 10.1 [10.001] / 10
Engine - Engine and crankcase 32. Install a suitable lifting device (1) to the pump assem- bly. 16 RAIL13SSL0168BA 33. Remove the bell housing bolts. 17 RAIL13SSL0167BA 34. Remove the engine mount bolts. 35. Repeat step 34 on the other side. 18 RAIL13SSL0166BA 48142070 15/09/2017 10.1 [10.001] / 11
Engine - Engine and crankcase 36. Attach a suitable lifting device to the engine, and re- move the engine. 19 RAIL13SSL0165BA 48142070 15/09/2017 10.1 [10.001] / 12
Engine - Engine and crankcase Engine - Install DANGER Heavy objects! Lift and handle all heavy components using lifting equipment with adequate capacity. Always support units or parts with suitable slings or hooks. Make sure the work area is clear of all bystanders. Failure to comply will result in death or serious injury. D0076A 1. Slowly lower the engine into the engine compartment. 1 RAIL13SSL0165BA 2. Apply LOCTITE 242 to the engine mount bolts (1). Install the engine mount bolts (1). Torque the engine mount bolts (1) to 84 N m (62 lb ft). 3. Repeat step 2 on the other side. 2 RAIL13SSL0166BA 4. Apply LOCTITE 242 to the bell housing bolts. Install the bell housing bolts. Torque the bell housing bolts to 48 N m (35 lb ft). 3 RAIL13SSL0167BA 48142070 15/09/2017 10.1 [10.001] / 13
Suggest: If the above button click is invalid. Please download this document first, and then click the above link to download the complete manual. Thank you so much for reading
Engine - Engine and crankcase 5. Remove the lifting equipment (1) on the pump assem- bly. 4 RAIL13SSL0168BA 6. Connect the battery wire (1) on the alternator. 7. Connect the regulator connector (2) on the alternator. 8. Connect the battery cable (3) on the starter. 9. Connect the starter ignition wire (4). 10. Connect the ground cable (5). 5 RAIL13SSL0162BA 11. Install the battery tray and hardware (1). 6 RAIL13SSL0171BA 48142070 15/09/2017 10.1 [10.001] / 14
https://www.ebooklibonline.com Hello dear friend! Thank you very much for reading. Enter the link into your browser. The full manual is available for immediate download. https://www.ebooklibonline.com