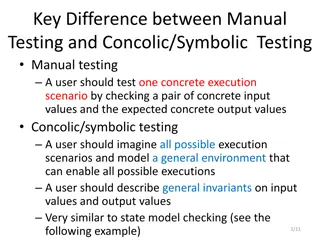
Concolic Execution: Formal Methods Foundation
Concolic execution is a formal method foundation focusing on program validation techniques such as path explosion, environment modeling, and solver limitations. Learn about techniques like DART and CUTE developed around 2005, and understand the steps involved in concolic execution to effectively test programs.

Download Presentation

Please find below an Image/Link to download the presentation.
The content on the website is provided AS IS for your information and personal use only. It may not be sold, licensed, or shared on other websites without obtaining consent from the author.If you encounter any issues during the download, it is possible that the publisher has removed the file from their server.
You are allowed to download the files provided on this website for personal or commercial use, subject to the condition that they are used lawfully. All files are the property of their respective owners.
The content on the website is provided AS IS for your information and personal use only. It may not be sold, licensed, or shared on other websites without obtaining consent from the author.
E N D
Presentation Transcript
Functions and forms doc. Ing. Marcela Hallov , PhD.
Introducing VBA Functions Excel includes more than 450 predefined worksheet functions. Creating a custom function can greatly simplify your formulas by making them shorter, and shorter formulas are more readable and easier to work with. Another reason is that you can write functions to perform operations that would otherwise be impossible.
Creating a custom function This example function, named NumSign, uses one argument. The function returns a text string of Positive if its argument is greater than zero, Negative if the argument is less than zero, and Zero if the argument is equal to zero. If the argument is nonnumeric, the function returns an empty string.
Creating a custom function You can, of course, accomplish the same effect with the following worksheet formula, which uses nested IF functions: =IF(ISNUMBER(A1),IF(A1=0,"Zero",IF(A1>0,"Po sitive","Negative")),"") Custom function solution is easier to understand and to edit than the worksheet formula.
Using the function in a worksheet When you enter a formula that uses the NumSign function, Excel executes the function to get the result. This custom function works just like any built-in worksheet function. You can insert it in a formula by choosing Formulas Function Library Insert Function, which displays the Insert Function dialog box. (Custom functions are listed in the User Defined category.) When you select the function from the list, you can then use the Function Arguments dialog box to specify the arguments for the function. You can also nest custom functions and combine them with other elements in your formulas.
Analyzing the custom function Function NumSign(num) If IsNumeric(num) Then Select Case num Case Is < 0 NumSign = "Negative" Case 0 NumSign = "Zero" Case Is > 0 NumSign = "Positive" End Select Else NumSign = "" End If End Function
Notice that the procedure starts with the keyword Function, followed by the name of the function (NumSign). This custom function uses one argument (num), and the argument s name is enclosed in parentheses. The num argument represents the cell or value that is to be processed. When the function is used in a worksheet, the argument can be a cell reference (such as A1) or a literal value (such as 123). When the function is used in another procedure, the argument can be a numeric variable, a literal number, or a value that is obtained from a cell.
The first statement inside the function is an If statement. It starts what is known as an If block. An If block consists of an If statement, an End If statement, one or more optional Else If statements, and one optional Else statement. The previous code is indented in a way that makes it obvious that the Else and End If statements near the bottom of the function belong to the If statement near the top of the procedure. Indenting is optional, but you ll find your code is much easier to read if you do it.
The If statement contains the built-in function IsNumeric that returns a True if the argument is a number and False if it s not. Whenever a built-in function begins with Is or Has, it returns True or False (a Boolean value). The NumSign function uses the Select Case construct to take a different action, depending on the value of num. If num is less than zero, NumSign is assigned the text Negative. If num is equal to zero, NumSign is Zero. If num is greater than zero, NumSign is Positive. The value returned by a function is always assigned to the function s name.
Learning about Function Procedures A custom function has much in common with a Sub procedure. Function procedures have some important differences, however. Perhaps the key difference is that a function returns a value (such as a number, a date, or a text string). When writing a function, the value that s returned is the value that has been assigned to the function s name when a function is finished executing.
To create a custom function, follow these steps: 1. Activate the VB Editor. (Press Alt+F11.) 2. Select the workbook in the Project Explorer (choose View Project Explorer if it s not already visible). 3. Choose Insert Module to insert a VBA module, or you can use an existing code module. However, it must be a standard VBA module. 4. Enter the keyword Function followed by the function s name and a list of the arguments (if any) in parentheses. If the function doesn t use an argument, the VBE adds a set of empty parentheses. 5. Type the VBA code that performs the work and make sure that the variable corresponding to the function s name has the appropriate value when the function ends. This is the value that the function returns. 6. End the function with an End Function statement. The VBE adds this statement automatically when you type the function statement.
What a Function Cant Do Almost everyone who starts creating custom worksheet functions using VBA makes a fatal mistake: they try to get the function to do more than is possible. A worksheet function returns a value, and the function must be completely passive. In other words, the function can t change anything on the worksheet. For example, you can t develop a worksheet function that changes the formatting of a cell. If your function attempts to perform an action that isn t allowed, the function simply returns an error. VBA functions that aren t used in worksheet formulas can do anything that a regular Sub procedure can do, including changing cell formatting.
Using Function Procedure Arguments Arguments can be variables (including arrays), constants, literals, or expressions. Some functions do not have arguments. Some functions have a fixed number of required arguments (from 1 to 60). Some functions have a combination of required and optional arguments.
Creating UserForms The following is an example of a simple macro that makes each cell in the selected range uppercase (but skips cells that have a formula). The procedure uses VBA s built-in StrConv function: Sub ChangeCase() For Each cell In Selection If Not cell.HasFormula Then cell.Value = StrConv(cell.Value,vbUpperCase) End If Next Cell End Sub
Creating UserForms cont. This macro is useful, but it can be improved. For example, the macro would be more helpful if it could also change the cells to lowercase or proper case (only the first letter of each word is uppercase). This modification is not difficult to make, but if you make this change to the macro, you need some method of asking the user what type of change to make to the cells. The solution is to present a dialog box. This dialog box is a UserForm that was created by using the Visual Basic Editor (VBE), and it s displayed by a VBA macro.
Exploring UserForm Alternatives - Using the InputBox function The InputBox function is useful for obtaining a single input from the user. A simplified version of the function s syntax follows: InputBox(prompt[,title][,default]) The elements are defined as follows: prompt (Required): Text that is displayed in the input box title (Optional) : Text that appears in the input box s title bar default (Optional): The default value The following is an example of how you can use the InputBox function: CName = InputBox("Customer name?","Customer Data") When this VBA statement is executed, Excel displays the dialog box:
Exploring UserForm Alternatives - Using the MsgBox function The VBA MsgBox function is a handy way to display information and to solicit simple input from users. We use the VBA MsgBox function in many of this book s examples to display a variable s value. A simplified version of the MsgBox syntax is as follows: MsgBox(prompt[,buttons][,title]) The elements are defined as follows: prompt (Required): Text that is displayed in the message box buttons (Optional): The code for the buttons that are to appear in the message box title (Optional): Text that appears in the message box s title bar You can use the MsgBox function by itself or assign its result to a variable.
Creating UserForms: An Overview 1.Determine exactly how the dialog box is going to be used and where it will fit into your VBA macro. 2.Activate the VBE and insert a new UserForm. 3.Add the appropriate controls to the UserForm. 4.Create a VBA macro to display the UserForm. This macro goes in a normal VBA module. 5.Create event handler VBA procedures that are executed when the user manipulates the controls (for example, when the user clicks the OK button). These procedures go in the code module for the UserForm.
Working with UserForms To create a dialog box, you must first insert a new UserForm in the VBE. Make sure that the correct workbook is selected in the Project window and then choose Insert UserForm. The VBE displays an empty UserForm. When you activate a UserForm, the VBE displays the Toolbox, which is used to add controls to the UserForm.
Changing the properties of a control Every control that you add to a UserForm has several properties that determine the way the control looks and behaves. You can change some of these properties (such as Height and Width) by clicking and dragging the control s border. To change other properties, use the Properties window. To display the Properties window, choose View Properties Window (or press F4). The Properties window displays a list of properties for the selected control. (Each control has a different set of properties.) If you click the UserForm itself, the Properties window displays properties for the form.
Displaying a UserForm You also need to write a procedure to display the UserForm. You use the Show method of the UserForm object. The following procedure displays the UserForm named UserForm1: Sub ShowDialog() UserForm1.Show End Sub This procedure should be stored in a regular VBA module (not the code module for the UserForm). If your VB project doesn t have a regular VBA module, choose Insert Module to add one. When the ShowDialog procedure is executed, the UserForm is displayed.
Creating the UserForm - example 1. Choose Developer Code Visual Basic (or press Alt+F11). The VBE appears. 2. Click your workbook s name in the Project Explorer to activate it. 3. Choose Insert UserForm. The VBE adds an empty form named UserForm1 and displays the Toolbox. 4. Press F4 to display the Properties window, and then change the following properties of the UserForm object:
Creating the UserForm example cont. 5. Use the Toolbox to add a Label object to the UserForm. If the Toolbox is not visible, choose View Toolbox. 6. Select the Label object, and in the Properties window change the Name property to lblMessage and enter any text you want in the Caption property. 7. In the Properties window, click the Font property and adjust the font. You can change the typeface, size, and so on. The changes then appear in the form. In this example, the TextAlign property was set to the code that center aligns the text. 2 fmTextAlignCenter 8. Use the Toolbox and add a CommandButton object to the UserForm. Then use the Properties window to change the following properties for the CommandButton: 9. Make other adjustments so that the form looks good to you. You can change the size of the form or move or resize the controls.
Testing the UserForm At this point, the UserForm has all of the necessary controls. What s missing is a way to display the UserForm. While you re developing the UserForm, you can press F5 to display it and see how it looks. To close the UserForm, click the Close button (X) in the dialog box title bar.
VBA procedure to display the UserForm when Excel is active: 1. Insert a VBA module by choosing Insert Module. 2. In the empty module, enter the following code: Sub ShowAboutBox() AboutBox.Show End Sub 3. Press Alt+F11 to activate Excel. 4. Choose Developer Code Macros (or press Alt+F8). The Macro dialog box appears. 5. Select ShowAboutBox from the list of macros, and then click Run. The UserForm appears. If you click the OK button, notice that it doesn t close the UserForm as you may expect. This button needs to have an event handler procedure for it to do anything when it s clicked. To dismiss the UserForm, click the Close button (X) in its title bar.
Creating an event handler procedure An event handler procedure is executed when an event occurs. In this case, you need a procedure to handle the Click event that s generated when the user clicks the OK button. 1. Press Alt+F11 to activate the VBE. 2. Activate the AboutBox UserForm by double-clicking its name in the Project window. 3. Double-click the CommandButton control. The VBE activates the code module for the UserForm and inserts the Sub and End Sub statements for the button s click event. 4. Insert the following statement before the End Sub statement: Unload Me
Thank you for your attention!