Explore how to represent forces pushing or pulling objects when they are not visible using arrows in a classroom setting. Understand the significance of arrow direction and length in indicating force strength. Engage in practical activities to enhance understanding of forces and their effects on objects.
Please find below an Image/Link to download the presentation.
The content on the website is provided AS IS for your information and personal use only. It may not be sold, licensed, or shared on other websites without obtaining consent from the author. If you encounter any issues during the download, it is possible that the publisher has removed the file from their server.
You are allowed to download the files provided on this website for personal or commercial use, subject to the condition that they are used lawfully. All files are the property of their respective owners.
The content on the website is provided AS IS for your information and personal use only. It may not be sold, licensed, or shared on other websites without obtaining consent from the author.
E N D
Presentation Transcript
FORCES LESSON 2B How Can We Draw the Forces Pushing or Pulling an Object When We Can t See Them?
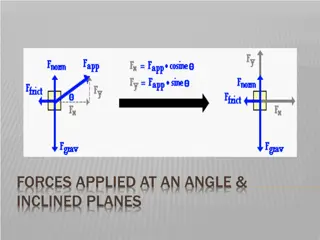
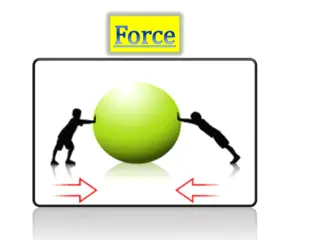
Review: Forces Look carefully at the diagram of our classroom cart. What does the arrow represent? What is the direction of the force? How do you know? What does the length of an arrow represent? How strong is the force acting on the cart in this diagram? How do you know?
Key Science Idea An arrow shows both the strength and direction of a force acting on an object.
Todays Focus Question How can we draw the forces pushing or pulling an object when we can t see them?
Questions to Think About What will happen if more than one force acts on an object at the same time? In what direction will the object move, or will it move at all? How can we use arrows to represent the strength and direction of the forces acting on the object?
Your Predictions What do you think will happen if more than one force acts on the cart at the same time? Discuss your ideas with an elbow partner. Be prepared to share your predictions with the class.
Practice with Forces and Arrows Pairs: Take turns exerting these forces on the toy car one at a time: 1. A small (gentle) force 2. A medium-strength force 3. A big (strong) force Then talk about these questions: What happened when you used a small, medium, or big force on the toy car? What differences did you observe in the car s motion? How can you use your arrows to show the direction of the force on the car? How can you use your arrows to show the strength of the force on the car?
Investigation: Forces and Toy Cars What do you predict will happen when you and your partner exert forces of the same (equal) strength on the toy car at the same time? How will you know whether the forces you re exerting on the car are the same?
Investigation: Forces and Toy Cars Pairs: Use your paper arrows to demonstrate the forces of equal strength that you and your partner exerted on the toy car. Which arrows best represent the forces both of you exerted on the car? Where will you place the arrows? Should the arrows touch the car? Reminder: Make sure to show both the strength and direction of the forces!
Investigation: Forces and Toy Cars What do you predict will happen when you and your partner exert forces of different (unequal) strength on the toy car at the same time? How will you know whether the forces you re exerting on the car are different? Decide which of you will exert a small (gentle) force on the car, and which of you will exert a big (strong) force.
Investigation: Forces and Toy Cars Pairs: Use your paper arrows to demonstrate the forces of unequal strength that you and your partner exerted on the toy car. Which arrows best represent the forces both of you exerted on the car? Where will you place the arrows? Reminder: Make sure to show both the strength and direction of the forces!
Show What You Know! 1. Work on your own to complete handout 2.1 (What Are the Forces?). 2. Draw arrows and write descriptions to show what you ve learned about equal and unequal forces acting on an object at the same time. 3. For the first diagram, draw one arrow showing the force acting on the car to get it moving. 4. For the other diagrams, draw two arrows representing the forces two people exert on the car.
Lets Summarize! Today s focus question: How can we draw the forces pushing and pulling an object when we can t see them? Work with an elbow partner to come up with your best answer to this question. Then complete this sentence in your science notebooks: I can t see the forces pushing and pulling an object, but I can represent them like scientists do by __________________________.
Next Time So far we ve explored what makes an object start to move and how we can represent these forces with arrows. Next time, we ll think about this question: Why do moving objects slow down and eventually stop?