Learn about soldering techniques for electronics work, including choosing the right solder alloys, understanding the solder core, selecting the appropriate soldering iron wattage, and mastering the art of soldering to create strong electrical connections.
Please find below an Image/Link to download the presentation.
The content on the website is provided AS IS for your information and personal use only. It may not be sold, licensed, or shared on other websites without obtaining consent from the author. If you encounter any issues during the download, it is possible that the publisher has removed the file from their server.
You are allowed to download the files provided on this website for personal or commercial use, subject to the condition that they are used lawfully. All files are the property of their respective owners.
The content on the website is provided AS IS for your information and personal use only. It may not be sold, licensed, or shared on other websites without obtaining consent from the author.
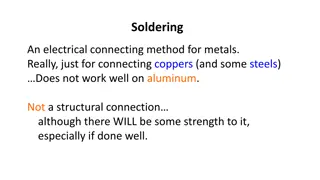
The process of making an electrical connection by melting low temperature metal alloys around the connection leads. The most common solder alloys usually consist of tin and lead and sometimes silver. The most common for electronics work is 60% tin, 40% lead (AKA 60/40) melting point about 370F.
Most solder will have a core of an acid or rosin to clean the material being soldered. Acid core is typically used for plumbing work. This is to etch the copper pipes for a water tight seal. Rosin core is typically used for electronics work. The rosin core removes oxidation on component leads.
Most electronics work is done with a soldering iron of 25 to 60 watts. The size of Iron will depend on the amount of material being heated. 25 watts good for most electronics assembly or small repair jobs. 60 watts or more, good for large mass soldering, such as soldering wires to chassis frames.
Soldering is as much art and experience than science. Plug in/turn on Iron and let it heat up. Clean soldering iron tip on damp sponge or cloth. A dirty iron tip will not transfer heat. Tin the tip of the iron. Apply some solder to the iron tip so it will have a coating of solder. The iron tip should be shiny. If the tip wont take solder, scrape with a knife blade or file and try again.
Remove heat and let cool. The art of this is to apply enough heat, solder, then remove. Too much heat and the circuit board land (the copper) will lift. Try to apply the solder to the parts to that will be soldered, not the tip of the iron.
A bad joint is usually referred to as a dry or cold solder joint. They are the cause of many joint failures. A good joint will be volcano shaped and shiny. A cold joint will be dull, granular and concave in shape.
Bend 1.2k Resistor .5. Insert, Solder and cut leads. Save a lead clipping, bend .4 for the Jumper. Insert, Solder and cut leads. Insert LED s into board. Bend the leads of the LEDS so the body is just at the edge of board. Pay attention to long and short leads. Insert, Solder and clip leads. Add probe wires made out of paper clips, Solder and clip.


![[PDF⚡READ❤ONLINE] Tutankhamun's Trumpet: Ancient Egypt in 100 Objects from the](/thumb/20549/pdf-read-online-tutankhamun-s-trumpet-ancient-egypt-in-100-objects-from-the.jpg)