Efficient Ways to Navigate and Manage Documents in Microsoft Word - Tips & Tricks
Learn various shortcuts and techniques to quickly open, navigate, and manipulate documents in Microsoft Word. Discover useful tips for efficient document management, including using keyboard shortcuts, dialog boxes, hotkeys, mouse pointers, and more.

Download Presentation

Please find below an Image/Link to download the presentation.
The content on the website is provided AS IS for your information and personal use only. It may not be sold, licensed, or shared on other websites without obtaining consent from the author. If you encounter any issues during the download, it is possible that the publisher has removed the file from their server.
You are allowed to download the files provided on this website for personal or commercial use, subject to the condition that they are used lawfully. All files are the property of their respective owners.
The content on the website is provided AS IS for your information and personal use only. It may not be sold, licensed, or shared on other websites without obtaining consent from the author.
E N D
Presentation Transcript
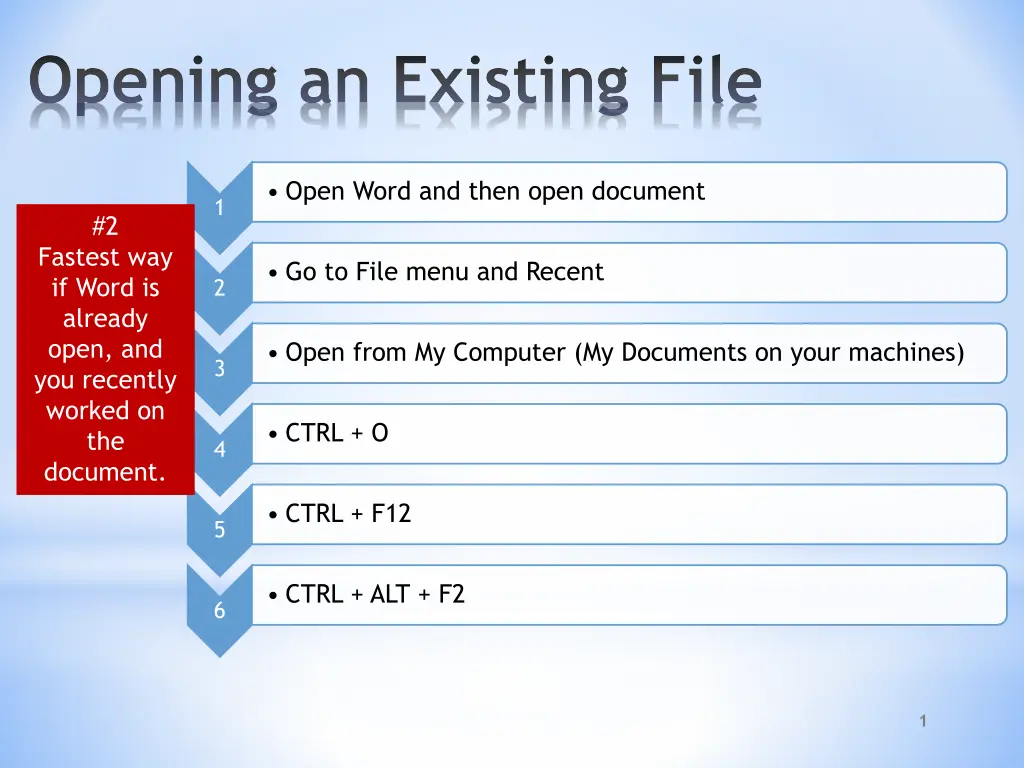
Opening an Existing File Open Word and then open document 1 #2 Fastest way if Word is already open, and you recently worked on the document. Go to File menu and Recent 2 Open from My Computer (My Documents on your machines) 3 CTRL + O 4 CTRL + F12 5 CTRL + ALT + F2 6 1
Open Dialog Box Open options drop- down list New Folder button File Name box Tools button Files of Type drop-down list 2
Navigating Through a Document Keyboard Page Up & Page Down keys Scroll box Arrows key (aka: directional keys) 3
Manipulating Windows Note: Shows this view when window is using the full screen. Restore Down Close Minimize Note: Shows this view when window is not using the full screen. Maximize 4
Navigating Through a Document Shift + F5 Takes you back to the last place you visited. Home End Beginning of line End of line CTRL + Home Top of document CTRL + End Bottom of document 5
Navigating Through a Document Mouse Pointers The appearance of the mouse pointer changes based on the actions that you are performing. Some pointing devices have scroll wheels to help with navigation. Mouse pointers source: http://yoingco.com/index.htm 6
Navigating Through a Document More Hot Keys (aka: Shortcut keys) CTRL + Page Up (move to top of page) CTRL + Page Down (move to bottom of page) CTRL + F10 (maximizes document window) ALT + F10 (minimizes document window) ALT + F5 (restoresthe program window size) 7
Inserting text in a Document Insert mode versus Overtype mode By default, Word opens in the Insert mode. If you wish to replace text by typing over it, press the Insert button (located near the top right of the keyboard). This will toggle the insert button to the overtype button. Toggle: computers: a setting that can be switched between two different options by pressing a single key, making a single choice from a menu, etc. Source: The Learners Dictionary Insert mode: inserts text to the right of I-beam Overtype mode: replaces text to the right I-beam 8
Inserting Text in A Document Selecting Text (Oh, so many ways ) Adjacent: Side-by-side Single character: click and drag over it Word: double-click it or drag over it Paragraph: triple-click it or drag over it Sentence: CTRL + click anywhere in it or drag over it Selecting adjacent blocks of text: dragging over it Non-adjacent blocks of text: CTRL + dragging over the blocks Selecting all text in a document: CTRL + A Non-adjacent: Not side-by-side 9
Inserting Text in A Document Selecting Text Continued Alternative Methods Selection Bar Shows on ruler as a gray area (actually the margin area) Keyboard arrow keys in conjunction with SHIFT key Selection bar to the left of the document text for one or more lines Triple click the selection bar for entire document 10
Deleting &Restoring Text in a Document Undo Redo 11
Deleting &Restoring Text in a Document: Word Options 12
Deleting &Restoring Text in a Document: Alternative Methods Select text and press backspace key or delete key. Note: If you accidently hit the space bar or any other key, the selected text is replaced. If you didn t mean to replace it, just click Undo on the QAT. 13
Creating a Folder in Word 2010 For good file management and quick document retrieval, it is important that you organize your work into folders and subfolders. Example: My Documents (is your main folder) Individual class folders (are your subfolders) Math English Art MSITA 14
Creating a Folder in My Documents You can create your folders before entering Word by going to your My Documents (or any other folder) and Clicking on File, New, and Folder. Note: You will often see Drive E for me because I use an external hard drive to store all of my files. That way I can access my files at home, school, etc. 15
Renaming a Folder or File Just right-click on it and type the new name. Caution: Make sure that you don t change the file extension when renaming files. Whatever is selected is what changes. In Word the file extension is .docx (for 2007 & 2010) and .doc (for prior versions). 1 2 16
Save versus Save As Save As = 2 documents Save = 1 document 17
Save versus Save As Save As Must click on File and Save As to access Save As. Save Changes are saved on top of current document. Another document is created. The original is kept intact. If document is already named, you can just click on the on the QAT. The new document can now be edited. 18
Common File Formats/Extensions .txt (Plain Text Format) This is a good extension to use if all you need is to preserve the text. Example: You have a word processor at home, but it is not a version of Word. Save your file as a .txt and pull it into Word when you get to school to format it. .rtf (Rich Text Format) Similar to .txt, but it saves underlines, boldface, etc. Image source for common file formats; http://www.fileinfo.com/common.php 19
Saving with a .rtf file extension Click in Save as type and scroll down until to you get .rtf. Many of the files in your class are saved in .pdf. This displays the document using Adobe reader. This format preserves your formatting even if the users do not have the same fonts installed on their computers. 20