Electronics Status at USTC
This content provides an in-depth look at the status and architecture of electronics at the University of Science and Technology of China (USTC). It covers topics such as system architecture, FEB usage, complete sTGC layer setup, connector details, and read-out electronics. Detailed images and explanations offer insights into the layout and design aspects of the electronics system at USTC.

Download Presentation

Please find below an Image/Link to download the presentation.
The content on the website is provided AS IS for your information and personal use only. It may not be sold, licensed, or shared on other websites without obtaining consent from the author.If you encounter any issues during the download, it is possible that the publisher has removed the file from their server.
You are allowed to download the files provided on this website for personal or commercial use, subject to the condition that they are used lawfully. All files are the property of their respective owners.
The content on the website is provided AS IS for your information and personal use only. It may not be sold, licensed, or shared on other websites without obtaining consent from the author.
E N D
Presentation Transcript
Electronics Status at USTC Feng Li, Shuang Zhou, Peng Miao, Ge Jin July 21st, 2020 University of Science and Technology of China 1
Outline System Architecture FEB Status VMM3 Usage on FEB ROD Status Adapter Board design 2
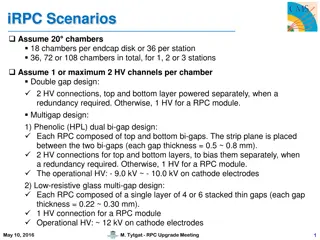
Complete sTGC layer The strips of each sTGC layer can be handled by 24 Front-End Boards. In total, there will need 96 FEBs for 4 sTGC layers. The innermost sTGC layer locate in the cone at the place with diameter of 152cm About 10cm gap between the sTGC border and the cone FEB boards are vertically inserted in the sTGC chamber. FEB #6 FEB #1 FEB #1 FEB #6 FEB #6 FEB #1 FEB #1 FEB #6 4
Layout in the cone 7-inch distance between adjacent sTGC chambers. FEBs are vertically inserted into the connector slots on chamber. FEBs are almost parallel to the particle beams. 3-6 power cables can be grouped together and then distributed to each FEB near the chamber. 7
Connector between chamber and FEB Connector P/N on chamber: SAMTEC HSEC1-060-01- S-DV-A-K, used as board slot connector Connector size on chamber: 69.5 * 5.6 * 7.8mm (L*W*H) 1.0mm pitch, dual rows, 60 positions/row 120 strip signals can be connected to the connector Surface-mounted, can be soldered manually. No connectors needed on FEB: Golden fingers on both layers of FEB Each FEB contains two connectors, capable of up 240 strip channels (sTGC chamber can supply ~210 strips for each FEB). 8
Connector Pin Map 120 positions:14 for signal Ground(marked with G ), 106 for strips. Footprint on chamber Golden fingers on FEB 9
Read-out Electronics Architecture 96 Front-End Boards 16 Read Out Driver Module ROD modules are designed based on Standard VME 6U Crate(with DC power supply) 10
FEB Status 11
FEB is shown on the right. Test the performance of the GTX link . The VMM configuration and readout. Check the power supply of the FEB. FEB weight: shown<70g cooling pad and cages power < 20g data cable and power cable < 15g FEB weight < 110g
Test the performance of the GTX link at 4 Gbps by Xilinx IBERT core. The left picture shows the test platform, and the results are shown below. Test the GTX link with different length of the mini-SAS cable (0.5m, 1m, 2m, 3m), and the GTX link works steadily at all length. Power: 10V, 0.8A (4 VMMs configured and readout, GTX activated).
Completed work: 1. VMM configuration and readout. We can configure VMM in right mode, and readout the events data of test pulses from VMM. 2. Reformat events data. Add Cyclic Redundancy Check in each data packet, and scramble the data stream before transmitting. 3. Transmit data packets at 4 Gbps by GTX. 4. Slow data links(40Mbps) tests. Slow data links between FEB and ROD, include the clock signal, the trigger signal, and the commands.
Next to do: 1. Test VMM readout with the external test pulse. 2. Monitor the temperature sensor of VMM. 3. Power connector and Data connector will be replaced by vertical types in the next version of FEB.
VMM3 usage on FEB configuration and readout 17
VMM3 configuration Global register: 192 bits Charge polarity Gain(0.5,1,3,4.5,6,9,12,16mV/fC) Peaking Time(200,100,50,25ns) Coarse threshold DAC Test Pulse DAC 19
VMM3 configuration Channel register: 24 bits/CH Threshold trimming Internal test pulse VMM Configuration Process: 192 + 24 * 64 = 1728 bits configure VMM through SPI. Each VMM can be configured individually. 18*96-bits: 2*96-bits for global registers, 16*96-bits for channel registers. 20
VMM3 configuration GUI Used for ATLAS FEB mass inspection Can be transplanted to be used for STAR FEB test before shipment. 21
VMM Mode: Non-ATLAS Continuous Mode. VMM Data Format: Each event data is 38 bits, contains 1 bit flag, 1 bit threshold, 6 bits channel ID, 10 bits PDO, 8 bits TDO, and 12 bits BCID.
ROD Status 23
ROD Architecture 6 DATA connectors compatible with 6 FEBs Xilinx Kintex-7 FPGA: XC7K325T- 2FFG900I FEAST power modules 2 optical fiber SFP+ to communicate with STAR DAQ (1 for spare) ROD size:233*100mm TCD circuit for STAR DAQ connection. USB3.0 connector added for communication with PC(not necessary for STAR). 24
TCD circuit LVPECL(from cable) LVTTL FPGA 120-ohm resistors kept but only one board needs to solder them Busy signal from FPGA will return to TCD board. 26
POWER 4 FEAST ASICs used: Digital 3.3V: SFP+ Powering, SPI Flash, TCD, GPIO DDR_1.5V(LDO): DDR powering 0.75V(LDO):DDR reference voltage Digital 1.0V: FPGA core voltage and MGT_AVCC Digital 1.2V: MGT_AVTT Digital 1.8V: FEB links 27
Board Status ROD boards will be back early August. Then 1-2 weeks for soldering. Firmware development ongoing: Decode data packet; Descramble; CRC 10G SFP+ code transplanting; DDR3 code development 28
Adapter between FEB and Simulator Board 29
STGC Signal Simulator board 256 channels charge output, ~0.4pC Used as external test pulse source for FEB 30
Connection 32
Thanks! 33