Exploring Standing Waves in a String: University of Ottawa Experiment
Delve into the physics of standing waves in a string with this hands-on laboratory experiment at the University of Ottawa. Understand how factors like tension, density, and frequency impact wave behavior and create mesmerizing patterns. Get ready to investigate the dynamics of wave phenomena and enhance your understanding of wave speed, string density, and wave modes.

Download Presentation

Please find below an Image/Link to download the presentation.
The content on the website is provided AS IS for your information and personal use only. It may not be sold, licensed, or shared on other websites without obtaining consent from the author. If you encounter any issues during the download, it is possible that the publisher has removed the file from their server.
You are allowed to download the files provided on this website for personal or commercial use, subject to the condition that they are used lawfully. All files are the property of their respective owners.
The content on the website is provided AS IS for your information and personal use only. It may not be sold, licensed, or shared on other websites without obtaining consent from the author.
E N D
Presentation Transcript
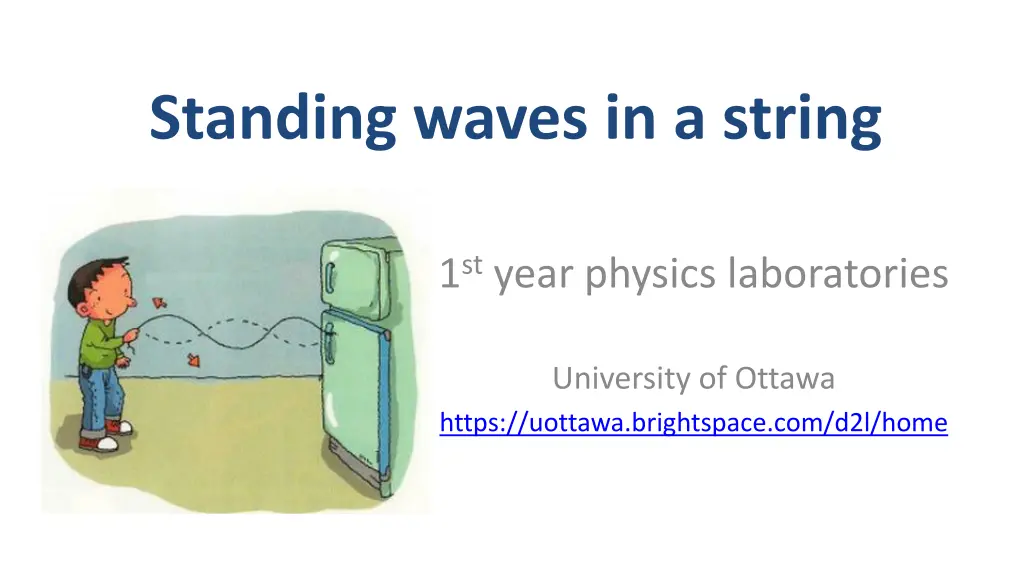
Standing waves in a string 1styear physics laboratories University of Ottawa https://uottawa.brightspace.com/d2l/home
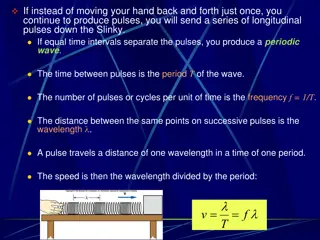
INTRODUCTION When you shake a string, a pulse travels down its length and can be reflected. A series of periodic waves can interfere with their reflections and with the right conditions, a superposition of these waves leads to a standing wave. This looks like a stationary wave on the string with some parts hardly moving (nodes) and some regions having large displacement (antinodes). In this experiment you will investigate various factors that give rise to standing waves.
WAVELENGTH AND FREQUENCY We consider how the speed of the wave is affected by the density of the string, the tension, and the frequency. Consider the following standing wave made by a string vibrator Any place the string (with length, ?) is fixed will be a node (both ends). The number of segments in the wave is referred to as n. In this wave, ? = ?. Each segment of the wave corresponds to one half of a wavelength, ?. Here, ? = ?/2.
WAVELENGTH AND FREQUENCY (cont.) If you drive a string at an arbitrary frequency, you probably won t get a standing wave since many modes of the wave will be mixed together. If the tension, the frequency, and the length are adjusted accordingly, you will see one vibrational mode occur at a higher amplitude. For a wave with wavelength, ?, and frequency, ?, the speed is: ? = ?? Where ? is measured in m/s, ? is measured in m, and ? is measured in Hz (1 Hz = 1 s-1)
WAVE SPEED AND STRING DENSITY For a wave on a string, the speed, ?, is also related to the tension, ?, in the string and the linear density, ?: ? = ? The linear density is mass per unit length. The tension is created by a hanging mass, ? ? = ?? ?
PRELIMINARY STUFF Launch Logger Pro and the Function Generator. Install the C-clamp with string vibrator 1 m away from the end clamp. Run the string to the clamp screw and hang the string over the edge with the mass hanger attached (as shown in the picture to the right). Measure the length of the string on the TA s desk as well as its mass. Calculate the linear density, ?. Calculate the fundamental frequencies for ? = 2 5 for ? = 0.15, 0.25, and 0.35 kg and record your values in Table 1.
ZOOMED VIEW CLAMP AND THE PULLEY
THE myDAQ BOARD We will use a myDAQ and a digital function generator to create waves in the string. The myDAQ signal is amplified before it reaches the string vibrator. The function generator program is found on your desktop. Amplifier myDAQ Cables to string vibrator
WAVELENGTH AND FREQUENCY Connect the myDAQ to the amplifier to the string vibrator as shown in this figure (and previous page). The string vibrator will be driven using a sinusoidal pulse from the function generator.
THE FUNCTION GENERATOR Select the sine wave. Set the Frequency to the value you calculated for ? = 2, ? = 0.35 kg. Set the Amplitude to 0.2 V Make sure DC Offset is set to 0 V. Make sure the Device is set to myDAQ and Signal Route is set to AO 0. Click Run
ADJUSTING FREQUENCY You can adjust the frequency as necessary to get stable nodes. It is important that the vibrating blade is steady. When changing the frequency to find the best standing wave, start incrementing by 1 Hz, then 0.5 Hz, then 0.1 Hz. You do not have to use smaller increments than 0.1 Hz. You can either type in the new frequency each time or highlight the value and use the up and down arrow keys to make incremental changes. Complete Table 1 and make your Graph 1. You should be able to find the experimental value of from the slope.
CLEAN UP DUE DATE The report is due at the end of the lab session, i.e., at 12:50pm or 5:20pm. Turn off the computer and don t forget to take your USB key. Put back the masses and the hanger on the table. Move the string vibrator C-clamp back close to the other C-clamp. Please recycle scrap paper and throw away any garbage. Please leave your station as clean as you can. Push back the monitor, keyboard, and mouse. Please push your chair back under the table. PRE-LAB Don t forget to do your pre-lab for the next experiment! Thank you!


")