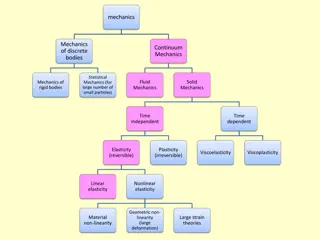
Football Play Diagrams
Explore various football play diagrams such as Seven-Man Mechanics Keys and Zone, Pro Set One, On Pass Play, Double Wing Two, Double Flanker Two, and more. Each diagram showcases player positions and strategies for successful plays. Images and descriptions provide a comprehensive understanding of different formations used in football coaching.

Download Presentation

Please find below an Image/Link to download the presentation.
The content on the website is provided AS IS for your information and personal use only. It may not be sold, licensed, or shared on other websites without obtaining consent from the author. If you encounter any issues during the download, it is possible that the publisher has removed the file from their server.
You are allowed to download the files provided on this website for personal or commercial use, subject to the condition that they are used lawfully. All files are the property of their respective owners.
The content on the website is provided AS IS for your information and personal use only. It may not be sold, licensed, or shared on other websites without obtaining consent from the author.
E N D
Presentation Transcript
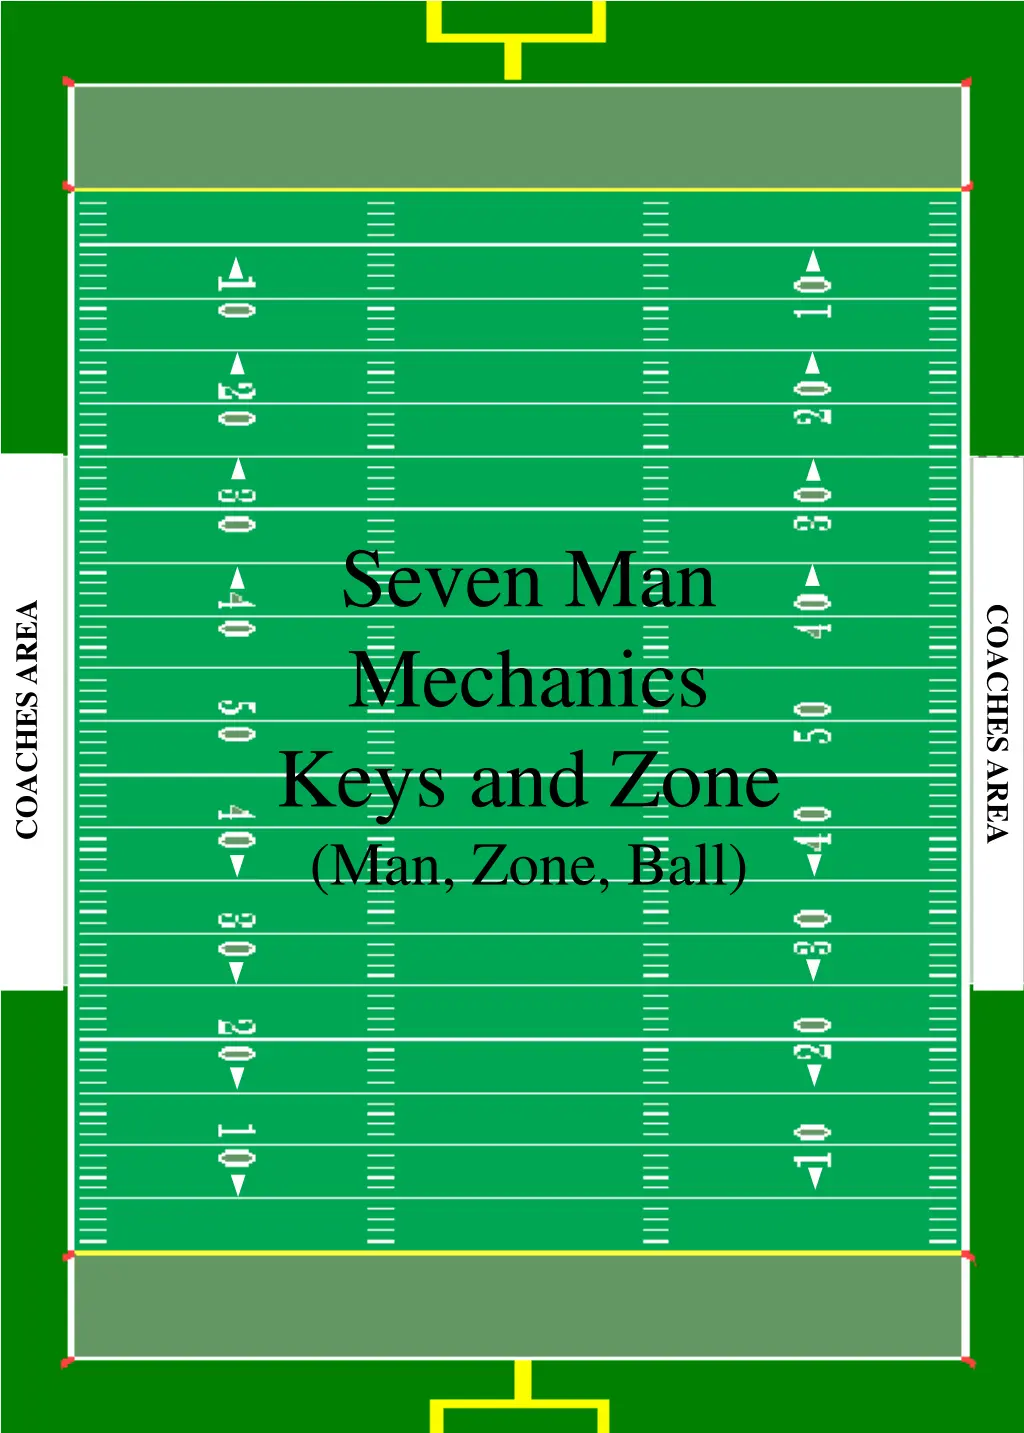
3 0 3 0 4 0 4 0 Seven Man Mechanics Keys and Zone (Man, Zone, Ball) COACHES AREA COACHES AREA 5 0 5 0 4 0 4 0 3 0 3 0
Pro Set One 3 0 3 0 R RB RB QB F C S G T T G 4 0 TE 4 0 HL LJ U COACHES AREA COACHES AREA 5 0 5 0 SJ FJ BJ 4 0 4 0 3 0 3 0
On Pass Play 3 0 3 0 R RB RB QB F 4 0 4 0 C S G T T G TE HL LJ U COACHES AREA COACHES AREA 5 0 5 0 SJ FJ BJ 4 0 4 0 3 0 3 0
Double Wing Two 3 0 3 0 R RB F QB F T C G T G TE 4 0 S 4 0 HL LJ U COACHES AREA COACHES AREA 5 0 5 0 SJ FJ BJ 4 0 4 0 3 0 3 0
Double Flanker Two 3 0 3 0 R RB QB F F C G T TE T G 4 0 TE 4 0 HL LJ U COACHES AREA COACHES AREA 5 0 5 0 SJ FJ BJ 4 0 4 0 3 0 3 0
Double Tight End Two 3 0 3 0 R RB QB F F C G T T G TE TE 4 0 4 0 HL LJ U COACHES AREA COACHES AREA 5 0 5 0 SJ FJ BJ 4 0 4 0 3 0 3 0
Pro Set Two 3 0 3 0 R RB RB QB F C G T T G 4 0 TE S 4 0 LJ HL U COACHES AREA COACHES AREA 5 0 5 0 FJ SJ BJ 4 0 4 0 3 0 3 0
Double Wing One 3 0 3 0 R RB QB F F C G T T G 4 0 S TE 4 0 LJ HL U COACHES AREA COACHES AREA 5 0 5 0 FJ SJ BJ 4 0 4 0 3 0 3 0
Double Flanker One 3 0 3 0 R RB RB QB F C S G T TE T G 4 0 4 0 LJ HL U COACHES AREA COACHES AREA 5 0 5 0 FJ SJ BJ 4 0 4 0 3 0 3 0
Trips 3 0 3 0 R RB F F QB S C 4 0 G T T G S 4 0 HL LJ U COACHES AREA COACHES AREA 5 0 5 0 SJ FJ BJ 4 0 4 0 3 0 3 0
Double Tight End One 3 0 3 0 R RB Q F F 4 0 C G T T G TE TE 4 0 LJ HL U COACHES AREA COACHES AREA 5 0 5 0 FJ SJ BJ 4 0 4 0 3 0 3 0
3 0 3 0 ANIMATED SLIDES 4 0 4 0 ANIMATED SLIDES ANIMATED SLIDES COACHES AREA COACHES AREA 5 0 5 0 4 0 4 0 3 0 3 0
Motion to Trips 3 0 3 0 R RB F QB F C S TE G T T G 4 0 4 0 HL LJ U COACHES AREA COACHES AREA 5 0 5 0 SJ FJ BJ 4 0 4 0 3 0 3 0
Trips Pass Coverage 1 3 0 3 0 R RB F F QB C 4 0 G T T G S TE 4 0 HL LJ U COACHES AREA COACHES AREA 5 0 5 0 SJ FJ BJ 4 0 4 0 3 0 3 0
Trips Pass Coverage 2 TE Stays and Blocks 3 0 3 0 R RB F F QB C 4 0 G T T G S TE 4 0 HL LJ U COACHES AREA COACHES AREA 5 0 5 0 SJ FJ BJ 4 0 4 0 3 0 3 0
Pass Coverage 1 3 0 3 0 R RB F QB F C 4 0 G T T G S TE 4 0 HL LJ U COACHES AREA COACHES AREA 5 0 5 0 SJ FJ BJ 4 0 4 0 3 0 3 0
Pass Coverage 2 3 0 3 0 R RB QB F F C 4 0 G T T G S TE 4 0 HL LJ U COACHES AREA COACHES AREA 5 0 5 0 SJ FJ BJ 4 0 4 0 3 0 3 0
Pass Coverage 3 3 0 3 0 R RB QB F F C 4 0 G T T G S TE 4 0 HL LJ U COACHES AREA COACHES AREA 5 0 5 0 SJ FJ BJ 4 0 4 0 3 0 3 0
Trips Coverage 1 3 0 3 0 R RB F QB F F C 4 0 G T T G TE 4 0 HL LJ U COACHES AREA COACHES AREA 5 0 5 0 SJ FJ BJ 4 0 4 0 3 0 3 0
Trips Coverage 2 3 0 3 0 R RB F QB F F C 4 0 G T T G TE 4 0 HL LJ U COACHES AREA COACHES AREA 5 0 5 0 SJ FJ BJ 4 0 4 0 3 0 3 0
5 Receiver Set TE in Motion at Snap 3 0 3 0 R QB F TE RB S C 4 0 G T T F G 4 0 HL LJ U COACHES AREA COACHES AREA 5 0 5 0 SJ FJ BJ BJ 4 0 4 0 3 0 3 0
5 Receiver Set TE Motion Resets Before Snap 3 0 3 0 R QB F TE RB S C 4 0 G T T F G 4 0 HL LJ U COACHES AREA COACHES AREA 5 0 5 0 SJ FJ BJ BJ 4 0 4 0 3 0 3 0
Trips Pass Coverage 1 3 0 3 0 R RB F QB F C 4 0 G T T G S 4 0 F HL LJ U COACHES AREA COACHES AREA 5 0 5 0 SJ FJ BJ 4 0 4 0 3 0 3 0
Trips Pass Coverage 2 3 0 3 0 R RB F QB F C 4 0 G T T G S 4 0 F HL LJ U COACHES AREA COACHES AREA 5 0 5 0 SJ FJ BJ 4 0 4 0 3 0 3 0
Trips Pass Coverage 3 3 0 3 0 R RB F QB F C 4 0 G T T G S 4 0 F HL LJ U COACHES AREA COACHES AREA 5 0 5 0 SJ FJ BJ 4 0 4 0 3 0 3 0
Trips Pass Coverage 4 3 0 3 0 R RB F QB F C 4 0 G T T G S 4 0 F HL LJ U COACHES AREA COACHES AREA 5 0 5 0 SJ FJ BJ 4 0 4 0 3 0 3 0
Run Coverage 1 3 0 3 0 R RB QB F F C 4 0 G T T G S TE 4 0 HL LJ U COACHES AREA COACHES AREA 5 0 5 0 SJ FJ BJ 4 0 4 0 3 0 3 0
Run Coverage 2 3 0 3 0 R RB RB QB S C G T T G F 4 0 TE 4 0 HL LJ U COACHES AREA COACHES AREA 5 0 5 0 SJ FJ BJ 4 0 4 0 3 0 3 0