Learn how to create an exploded view drawing of a pen, which is a helpful technique used in assembling and repairing products. Follow the step-by-step guide to draw each part separately and then assemble them along a center line. Also, spot the common error made in such drawings.
Please find below an Image/Link to download the presentation.
The content on the website is provided AS IS for your information and personal use only. It may not be sold, licensed, or shared on other websites without obtaining consent from the author. If you encounter any issues during the download, it is possible that the publisher has removed the file from their server.
You are allowed to download the files provided on this website for personal or commercial use, subject to the condition that they are used lawfully. All files are the property of their respective owners.
The content on the website is provided AS IS for your information and personal use only. It may not be sold, licensed, or shared on other websites without obtaining consent from the author.
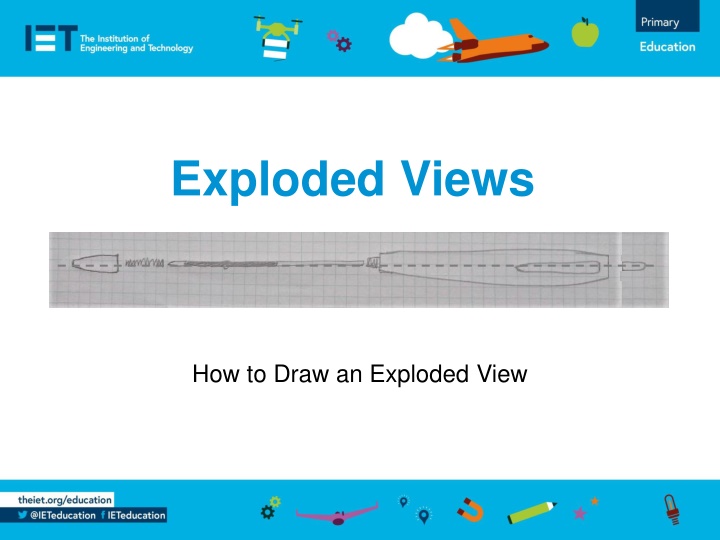
Exploded Views An exploded view is a type of drawing. It can be 2D or 3D. It shows the parts of a product taken apart and laid out along a line. Exploded views are used by people who are putting products together or who are repairing products. They are often found in instruction booklets. They were first used over 500 years ago! We are going to draw an exploded view of a pen
Drawing a Pen - Start The drawing used in these examples is for a different pen. It was drawn by a Year 5 called Ben. It shows the drawing method but it has an error see if you can spot it. We will point it out at the end. Centre line Case 1) Draw a centre line. 2) Draw the outline of the case of the pen, so the centre line runs along it.
Drawing a Pen Lining up the Parts 3) Add the inside parts to the drawing. Arrange these in order along the centre line. Plastic tube holding ink holding ink Plastic tube Case Case Spring
Drawing a Pen Finishing the drawing 4) Add the remaining parts to the drawing. 5) Label all the parts. Plastic tube holding ink Case Spring End cap
Did you Spot the Error in Bens drawing? The push button at the end should also have been placed along the line, not as part of the case. Plastic tube holding ink Case Spring End cap Push button