How to Make Design Patent Application Drawings That Get Approved
Learn how to make USPTO-compliant design patent drawings with this detailed guide. Discover required views, proper line work, common mistakes, and expert tools. Includes real examples, FAQs, and tips to avoid rejection. Perfect for inventors, designe

Download Presentation

Please find below an Image/Link to download the presentation.
The content on the website is provided AS IS for your information and personal use only. It may not be sold, licensed, or shared on other websites without obtaining consent from the author. If you encounter any issues during the download, it is possible that the publisher has removed the file from their server.
You are allowed to download the files provided on this website for personal or commercial use, subject to the condition that they are used lawfully. All files are the property of their respective owners.
The content on the website is provided AS IS for your information and personal use only. It may not be sold, licensed, or shared on other websites without obtaining consent from the author.
E N D
Presentation Transcript
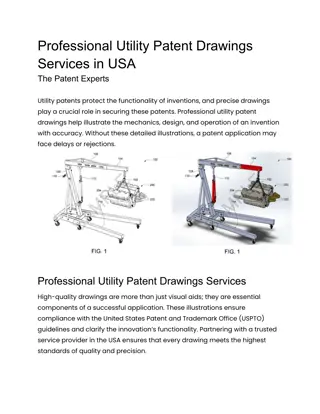
How to Make Design Patent Application Drawings That Get Approved The Patent Experts Design patents protect the visual appearance of a product rather than its utility. In this type of application, your drawings are not just illustrations they are the claims. That s why USPTO-compliant design patent drawings must be accurate, clear, and professionally executed.
In this comprehensive guide, well walk you through everything you need to know to create drawings that pass USPTO scrutiny without setbacks or rejections. Why Design Patent Drawings Matter Design patent drawings are the foundation of your application. They define the exact look of your product. If your drawings are unclear, inconsistent, or incomplete, the USPTO may reject the application outright. These illustrations must clearly disclose the design and leave no room for interpretation. Let s break down what makes them critical: They establish the legal scope of your design rights. They serve as the sole reference for infringement evaluation. They eliminate ambiguity during examination. Your words support the application. Your drawings are the application. Understanding USPTO Drawing Requirements The USPTO has a strict set of rules for design drawings. Ignoring these can result in costly delays or a rejected application. Here s what you need to include:
Required Views A complete set of views typically includes: Front View Rear View Left Side View
Right Side View Top Plan View Bottom Plan View Perspective View (highly recommended for 3D clarity) Each view must be consistent and proportional. For example, if you depict a curved edge in one view, that curve must appear identically in the corresponding angle. Line Work Solid lines indicate claimed features. Broken or dashed lines show unclaimed parts (like surroundings or environment). No shading or coloring unless used to show contour, and only if approved. Margins and Dimensions Keep 1" margins on all sides. Drawings must be in black ink on white background. Each figure should be centered and scaled to fit the page, without distortion. Choosing the Right Tools and Techniques While hand-drawn illustrations are technically allowed, digital vector drawings are the gold standard. They offer higher precision, easier revision, and cleaner output. Recommended Software AutoCAD SolidWorks
CorelDRAW Adobe Illustrator These tools help ensure your drawings are scalable, clean, and aligned with USPTO technical specs. Best Practices Use vector-based lines, not raster images. Export in PDF or TIFF at high resolution. Avoid 3D renderings unless explicitly required. Example: A Smartphone Design Patent Take Apple s famous iPhone design patents. They used crisp, high-contrast line art to emphasize the device s smooth edges, placement of buttons, and overall silhouette. Perspective views were used to show depth and spatial relations. By relying on precise, minimalistic drawings, they avoided over-detailing. Every single view was consistent with the rest, making the scope of the design unmistakably clear. Common Drawing Mistakes to Avoid Even minor errors can result in a USPTO Office Action. Here are common pitfalls and how to steer clear of them: Inconsistent proportions between views Missing views, especially perspective Overuse of broken lines Improper line weight or pixelation Including branding, color, or text
Case Study: A Costly Oversight A startup filed a design patent for a wearable device. Their side views did not match the top view, and they omitted a perspective view. The USPTO issued an Office Action. They had to rework their drawings, delaying the application by three months and increasing legal costs by $1,500. When to Use Broken Lines Broken lines help distinguish between claimed and unclaimed portions. They are essential if your design is part of a larger object. For instance, if you re patenting the unique handle of a mug, you d use solid lines for the handle and broken lines for the rest of the mug. Remember: Broken lines show environment or structure, not part of the claim. Overuse or misuse can confuse the scope and risk rejection. Hiring a Professional Patent Illustrator If you re not familiar with USPTO formatting or CAD tools, hiring an expert can be a wise investment. Patent illustrators specialize in meeting drawing standards and can save you from revisions or legal issues later. Benefits of Hiring a Specialist Precision and compliance with USPTO standards Quicker turnaround Revisions included Peace of mind
How Long Does It Take to Prepare Design Patent Drawings? A skilled illustrator can usually complete compliant drawings in 2 5 business days. Complexity, number of views, and revisions may affect this. If you re submitting internationally, allow more time for compliance with WIPO or EPO standards. FAQs About Design Patent Drawings Q: Can I submit photos instead of line drawings? A: Rarely. The USPTO allows photographs only when a design is too complex to draw. Even then, strict rules apply. Q: Are 3D renderings accepted? A: No. Renderings are not permitted. Only clean black-and-white line drawings or approved photos (in rare cases). Q: What happens if I forget a required view? A: The application may be rejected. You must submit a complete set of consistent views for approval. Q: Can I claim only part of a product? A: Yes, by using broken lines to show unclaimed areas. Q: How much do professional design patent drawings cost? A: Costs range from $150 to $500 depending on complexity and number of views. Final Checklist Before Filing All required views included Solid lines for claimed parts Broken lines for reference or environment
Consistent perspective and scale High-resolution, black-and-white vector format Proper margins and view labels No unnecessary shading or text Conclusion Design patent drawings are the most critical part of your application. They define the scope of your protection, communicate your idea visually, and help prevent costly litigation. Whether you re filing as an individual inventor or a startup, getting the drawings right is essential. If you want to avoid rejections, speed up approval, and protect your design with confidence don t risk going it alone. Need Expert Help with Your Design Patent Drawings? Let professionals take care of it for you. Visit The Patent Experts to get high-quality, USPTO-compliant design patent drawings prepared by industry experts. Fast turnaround, affordable pricing, and guaranteed accuracy trusted by inventors and patent attorneys alike. ?Click here to get started today and take the first step toward protecting your design!