Importance of Soil Testing for Healthy Plant Growth
Download Presenatation

Discover the significance of soil testing in optimizing plant growth through detailed insights provided by the LSU AgCenter's Soil Testing and Plant Analysis Lab. Learn why regular soil testing is crucial, how to obtain accurate results, and the benefits of professional recommendations tailored to your specific gardening needs.

Download Presentation
Please find below an Image/Link to download the presentation.
The content on the website is provided AS IS for your information and personal use only. It may not be sold, licensed, or shared on other websites without obtaining consent from the author. If you encounter any issues during the download, it is possible that the publisher has removed the file from their server.
You are allowed to download the files provided on this website for personal or commercial use, subject to the condition that they are used lawfully. All files are the property of their respective owners.
The content on the website is provided AS IS for your information and personal use only. It may not be sold, licensed, or shared on other websites without obtaining consent from the author.
E N D
Presentation Transcript
Module 2: Soil Testing and Results LSU AgCenter Home Gardening Certificate Course Dr. Joe Willis, Anna Timmerman & Christopher Dunaway
1) Soil testing will provide you with the information you need to treat your soil so your plants will flourish
2) Regular soil testing provides a history of your soil, the changes over time, and the effect of what you or nature does to it
3) Home soil testing kits are ballpark, professional labs are much more accurate
4) Professional labs will make recommendations based on what you plan to grow
LSU AgCenter Soil Testing and Plant Analysis Lab
1) https://www.lsuagcenter.com /portals/our_offices/departm ents/spess/servicelabs/soil_te sting_lab
2) Soil Analysis, Plant Tissue Analysis, Irrigation and Pond Water Analysis
3) Routine Soil Test: Includes pH; and levels of P, K, Ca, Mg, Na, S, Cu, and Zn. It will also provide lime/sulfur requirement, fertilizer requirements and soil texture
4) Additional tests you can request a. Organic Matter b. Aluminum c. Salts d. Manganese, Iron, Copper, Zinc e.Total Nitrogen f. Total Carbon g. Total Nitrogen and Carbon
5) Nitrogen is not a part of routine testing because it is so transient in the soil due to leaching and gaseous release
LSU AgCenter Soil Testing and Plant Analysis Lab
Plant tissue analysis you choose which test you want: 1)AgMetals (P, K, Ca, Mg, S, B, Zn, Cu, Fe, Mn, Mo, Al, and Na)
2) Nitrogen Test (Total Nitrogen)
3) AgMetals plus Carbon and Nitrogen
4) Environmental Metals (AgMetals plus Pb, Cd, As, Ni, Cr, Se, Co, and Si)
5) Environmental Metals plus Nitrogen
6) Environmental Metals plus Carbon and Nitrogen
7) Total Carbon and Nitrogen (Total Carbon and Nitrogen)
1) Routine or Pond Water Analysis results are distributed 7 to 10 working days from laboratory receipt of sample. (These tests include pH, Conductivity, Salts, Na, K, Mg, Ca, Fe, Mn, S, Cl, Nitrates, Alkalinity, Sodium Adsorption Ratio (SAR), and Hardness.)
2) Quick Water Analysis results are distributed 2 to 5 working days from laboratory receipt of sample. (This test includes Conductivity, Salts, Na, K, Mg, Ca, Fe, Mn, S, Cl, and Hardness.)
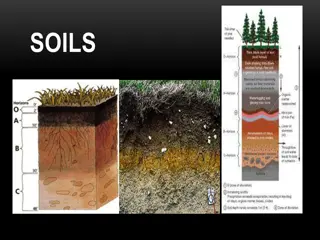
1) Soil is the ground, whats in the field we defined it in the first lesson
2) Potting Mix, Potting Soil, Soilless Mix, Container Mix this is a combination of various materials formulated specifically for growing plants in containers and contains less than 20% field soil
3) Mixes are composed of lightweight, natural and processed material such as peat, perlite, vermiculite, sand, bark, coconut fiber, compost, and similar materials.
4) Commonly tested parameters include pH, nitrate, and soluble phosphorus, potassium, calcium and magnesium
5) You need to indicate to the testing lab that you are submitting a Potting Mix for analysis
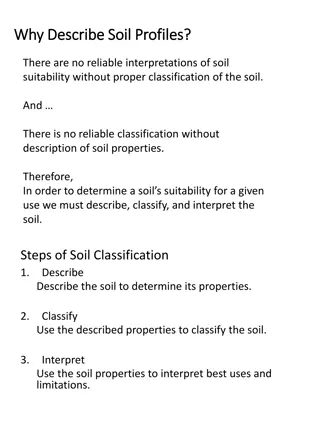
1) Soil testing should be done in order to get a representative picture of the root zone soil conditions
2) Root Zone The area of the soil from the surface and downward where the plant roots can penetrate and take up water and nutrients and exchange gases.
3) Root Zone thickness can be an inch or so to a depth of several feet dependent upon soil type and characteristics
4) For most garden plants, the root zone is 6 to 12 inches deep. This is the area you want to sample.
1) Take multiple samples from randomly selected locations in the garden aim for 10 spots
2) Take a slice about 1 thick and 6 deep at each site
3) Put all samples into a container and mix them together make sure the container wasn t used for measuring fertilizer of any kind.
4) After thoroughly mixing, take a cupful and place in sample bag.
5) Label the bag, choose a name that isn t too long but represents to you the location unique.
6) Put all samples into the box with filled form and payment and drop at the post office
1) Always take several aliquots of soil from each sample site
2) Always scrape away mulch, leaves or plant material before taking soil slices
3) Always take vertical slices six to eight inches deep
4) Always thoroughly mix aliquots before removing the sample
5) Always remove large pebbles, insects and large pieces of plant material before taking sample
6) Always clearly label the sample with a name of your choosing
7) Always fill out the accompanying form as completely and accurately as possible


 Soil testing will provide you with the")
 Regular soil testing provides a history of")
 Home soil testing kits are ballpark,")
 Professional labs will make")
 Soil Testing Eliminates Guessing!")

")
 Soil Analysis, Plant Tissue")
 Routine Soil Test: Includes pH;")
 Additional tests you can request")
 Nitrogen is not a part of")


 Nitrogen Test (Total")
 AgMetals plus Carbon and")
 Environmental Metals")
 Environmental Metals plus")
 Environmental Metals plus")
 Total Carbon and Nitrogen")

 Routine or Pond Water Analysis")
 Quick Water Analysis results are")

 Soil is the ground, what’s in")
 Potting Mix, Potting Soil,")
 Mixes are composed of")
 Commonly tested")
 You need to indicate to the")

 Soil testing should be done")
 Root Zone – The area of")
 Root Zone thickness can be")
 For most garden plants, the")

 Take multiple samples from")
 Take a slice about 1” thick")
 Put all samples into a")
 After thoroughly mixing,")
 Label the bag, choose a")
 Put all samples into the box")

 Always take several")
 Always scrape away mulch,")
 Always take vertical slices")
 Always thoroughly mix")
 Always remove large")
 Always clearly label the")
 Always fill out the")