Manufacturer Registration Instructions and Codes: Streamlined Process for Modular Unit Manufacturers
Trimmed the formalities, an overview of the step-by-step manufacturer registration process for modular unit manufacturers. Starting with individual information, business details, and structure description, ensuring compliance with mandatory fields marked with blue stars. Empower your organization's registration on the BCIS platform hassle-free.

Download Presentation

Please find below an Image/Link to download the presentation.
The content on the website is provided AS IS for your information and personal use only. It may not be sold, licensed, or shared on other websites without obtaining consent from the author.If you encounter any issues during the download, it is possible that the publisher has removed the file from their server.
You are allowed to download the files provided on this website for personal or commercial use, subject to the condition that they are used lawfully. All files are the property of their respective owners.
The content on the website is provided AS IS for your information and personal use only. It may not be sold, licensed, or shared on other websites without obtaining consent from the author.
E N D
Presentation Transcript
Manufacturer Registration Instructions Codes and Standards Stronger Codes Through Science and Consensus
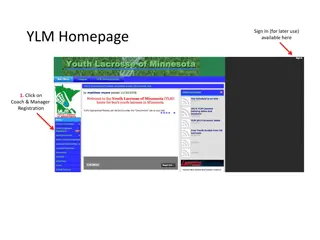
The link below will direct you to the BCIS Homepage https://test2.floridabuilding.org/c/default.aspx
Select Modular Unit Manufacturer (Parent - $600 Fee, Child - $250 Fee), then click Continue to proceed to the Registration page.
Registration page: Any field with a blue star/asterisk is a required field and has to be filled in. Note: The Login is limited to 8 characters(not case sensitive), the Password is also limited to 8 characters(CASE SENSITIVE)
Begin by filling in the section titled Individual Information, keeping in mind any field with a blue star/asterisk is a required field. Any field other than blue fields are not required and can be left blank.
The next section is the Business Information section. Please note the rest of the registration form is actually closed until you select New when you use the drop down for the field titled Business/Firm Name . Once new is selected, the rest of the form is open for you to complete. Make sure to complete any fields that have a blue star/asterisk. The other fields are optional.
Form FMBP 1-00 is the section used to describe the structure of your company. Any field that has a blue star/asterisk must be completed. Note: If your company does not have certain criteria to enter in a field, please use NA for non applicable (ex. Shown below). To complete this section, you MUST select a Third Party Agency. To complete this process, click the arrow for the Primary Third Party Agency* field and select your Third Party Agency from the options in the drop down. Zebra, Inc. has been selected for this example.
The Manufacturing Facility section is where information is inputted regarding the facility where the buildings are built. Any field that has a blue star/asterisk must be completed. Note: The Quality Control Manager Phone* entry does not accept dashes for a phone # . Please enter the phone number in the format seen in the example below.
The Product Information section is completed with the help of your Third Party Agency. They will help you determine which selections are. Note: Once a selection is made, that selection will be highlighted. If you want to add to the selection in a particular box, you MUST hold the Control (Ctrl) key on your keyboard down until you make the next selection. If you do not hold the Control (Ctrl) key until the next selection is made, the previously selected option will be de-selected and not be highlighted. The Description of Product (wood, steel, or concrete ) section is optional.
Upload Certificate button: As part of the registration process, a certificate of Product Liability Insurance must be uploaded to the BCIS(website). The certificate must be a PDF(Adobe) file to upload. Click the Upload Certificate button to look for the insurance certificate that is saved to your PC. O
Clicking the Choose File button will allow you to browse your PC. After finding the file, select the file and click the Attach button to attach the file to your registration page.
Once the insurance certificate is uploaded, you will see the attached file on the registration page(see ex. Below)
Once the certificate is uploaded, you will proceed to the payment section by clicking the next button.
Error messages: If there is a problem with this page when attempting to proceed to the next (payment) section, you will see error messages in red just above the section divider. You must address and clear these error messages before you can proceed to the next section.
If no error messages arise, you will then proceed to the payment section. Note: Make sure to have your payment method ready when you begin the registration process. If you get this far and then have to retrieve your payment information, there is a good chance you will be timed out of the system. This will require you to begin the registration process again. HAVE YOUR PAYMENT METHOD READY WHEN BEGINNING THE REGISTRATION PROCESS. THIS WILL SAVE YOU SOME TIME AND FRUSTRATION. The types of payment accepted by the BCIS(website) are listed at the bottom of the page. You will have to select the method of payment you wish to use (Credit card or Electronic Check)
Credit Card Payment: If Credit Card is selected, you will have to select the type of credit card and fill in the required fields( blue star/asterisk) and click the Submit button. Note: Pay close attention to the red warning regarding use of the back or refresh button. You will be charged more than once if you use either of these buttons.
Payment Confirmation: When payment has been accepted, you will see the following message below Thank you ___, your application fee has been accepted. Please print this receipt for your records. Make sure to print this page as a copy of your receipt. Also, you must click the Finish button at the bottom of the page to complete the registration.
Payment by Electronic Check: If paying by electronic check, fill in the fields as required and click the Submit button. Note: Pay close attention to the red warning regarding use of the back or refresh button. You will be charged more than once if you use either of these buttons.
Once completed, you will be taken to the following page. You are now registered in the BCIS and waiting on your Third Party Agency for the next step in the approval process. It is suggested you call your Third Party Agency once the registration process is complete. They will provide further guidance on the next steps.


 Buildings Button")