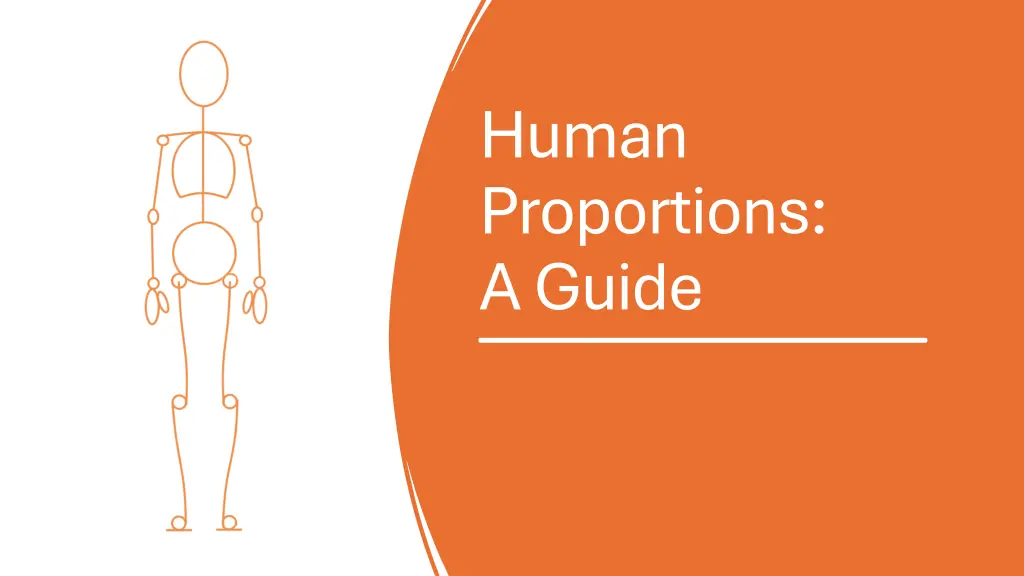
Learn how to accurately depict human proportions in visual art with this comprehensive guide. Discover the myth behind the 8-head tall concept, explore step-by-step instructions from drawing a guide-line to creating views of the human figure, and master essential elements like head-to-hip ratio, thighs, and more. Enhance your drawing skills and create realistic human figures with this informative guide.
Please find below an Image/Link to download the presentation.
The content on the website is provided AS IS for your information and personal use only. It may not be sold, licensed, or shared on other websites without obtaining consent from the author. If you encounter any issues during the download, it is possible that the publisher has removed the file from their server.
You are allowed to download the files provided on this website for personal or commercial use, subject to the condition that they are used lawfully. All files are the property of their respective owners.
The content on the website is provided AS IS for your information and personal use only. It may not be sold, licensed, or shared on other websites without obtaining consent from the author.
The Myth: 8 Heads Tall An adult human is not really 8 heads tall. Adult proportions vary widely. The average is closer to 7.5 heads. In Visual Art, we use the 8 head model because 8 divides easily. The beginning of the legs start at the halfway point. Almost everything is 1, 1.5, or 2 heads tall. It s very straightforward. Once you familiarize yourself with these proportions, you can and should modify them to give your characters variety!
Materials Any pencil An eraser A sharpener A sketchbook or loose paper A ruler for the guide-line only (optional)
Human Proportions: A Guide Step 1: Step 1: Guide Guide- -Line Line A: A: Draw a vertical line to the side, representing the total height of your figures. (You ll draw your figures beside this line.) B: B: Mark the top and bottom of this line with short horizontal lines. C: C: Add a horizontal line at the midpoint of your height line. D: D: Divide the line into four sections by adding two more horizontal lines. E: E: Further subdivide the line into eight equal sections by adding four additional horizontal lines.
Human Proportions: A Guide Step 2: Verify Step 2: Verify A: A: Ensure the spacing between each section is even. Make small adjustments if necessary. B: B: Number each section between the lines. (This will help you follow the rest of the instructions more easily.) You are now ready to draw multiple views of the human figure. Let s start with a front and a side view.
Human Proportions: A Guide Step 3: Head to Hip Step 3: Head to Hip Note: Each section of the guideline represents 1 head in height. A: A: Draw two oval heads at the level of 1 . Each head should be 1 head tall. Note the slant of the head when seen from the side. B: B: Draw the spine from the top of 2 to the bottom of 3 . The spine should be 2 heads tall. For the front view, draw a straight line. For the side view, replicate the subtle curve of the spine, avoiding exaggeration. C: C: Add the hips at the level of 4 . Each hip should be 1 head tall. For the front view, draw an oval slightly wider than the head (almost circular). Note that the tilt of the hips from the side is similar to the tilt of the head.
Human Proportions: A Guide Step 4: Thighs Step 4: Thighs A: A: For the front view, draw two circles at the bottom of 4 , one on either side of the hips. For the side view, place one circle within the oval, toward the left side. B: B: Place the knees at the bottom of 6 . For the front view, position the knees directly below the hip circles. For the side view, place the knee directly below the hip but just a little to the right of the thigh circle. C: C: For the front view, draw the leg starting from the middle of the top circle and ending on the inside of the bottom circle. For the side view, use a curved line that stays to the left of both circles.
Human Proportions: A Guide Step 5: Lower legs Step 5: Lower legs A: A: For the front view, place the circles for the feet at the bottom of 8 , directly below the knee circles. For the side view, position the circles at the bottom of 8 , slightly to the right of the knee. B: B: For the front view, draw the lower legs starting from the outer edge of the knee and ending at the inside edge of the foot. For the side view, draw the lower legs from the back of the knee to the center of the foot, following the slight curve shown in the example.
Human Proportions: A Guide Step 6: Feet Step 6: Feet A: A: Add the bottom of the feet. For the front view, draw a line at the bottom of the foot circles (from step 5). This line should extend slightly beyond the circles in both directions, defining the width of the feet. B: B: Add the bottom of the foot for the side view. This step can be tricky. The foot is approximately the same length as the forearm and about one head long. To check this, line up your arm (from elbow to wrist) with the bottom of your foot. While not a perfect match, it s fairly close! Draw the side view of the foot starting a little behind the foot circle, with a length equal to one head length.
Human Proportions: A Guide Step 7: Torso Step 7: Torso A: A: For the front view, draw of an oval. This portion of the oval should be 1 head tall, starting at 2.5 and ending at 3.5. Avoid drawing a full oval and then cutting off the bottom third. Ensure that the you draw is exactly 1 head tall. B: B: Complete the shape with a line that curves slightly upward. C: C: For the side view, draw a full oval between 2.5 and 3.5. Position the oval in front of the spine, following the angle shown in the example. Note that it is narrower than the front view and should not extend significantly beyond the hips for this base model. You can add variations, like a barrel chest, after practicing with this model.
Human Proportions: A Guide Step 8: Shoulders Step 8: Shoulders A: A: For the front view, draw a slightly curved line above the torso. This line should extend beyond the width of the hips. B: B: Place a circle at each end of the line to represent the shoulders. C: C: For the side view, place a circle inside the torso oval at 2.5. Position the circle at approximately the middle-top of the oval.
Human Proportions: A Guide Step 9: Upper Arms Step 9: Upper Arms A: A: For the front view, place the elbow at the bottom of 3 . Add small ovals for the elbows a little further out from the body than the shoulders. B: B: For the side view, place the elbow at the bottom of 3 and align it with the spine. C: C: For both the front and side views, connect the shoulder to the elbow with a line.
Human Proportions: A Guide Step 10: Lower Arms Step 10: Lower Arms A: A: For the front view, add the wrist by creating a small oval at the line between 4 and 5 . This should be directly below the wrist. B: B: For the side view, place the wrist on the line between 4 and 5 . It should line up vertically with the circle you drew for the top of the leg. C: C: Draw a line from the center of each elbow to the center of each wrist.
Human Proportions: A Guide Step 11: Hands Step 11: Hands NOTE: Hands are about of a head high. You can check this by placing the bottom of your hand on your chin and noticing that your fingers stretch to about your eyebrows. A: A: For both the front and side views, add long ovals below the wrist that extend just below 4.5. The side view is complete, as the thumbs are always on the inside and are not visible. B: B: For the front view, add a small oval between the hand and the body. This thumb should be slightly more than half the length of the hand, starting near the top.
Key Measurements to Note Key Measurements to Note Upper Arm Upper Arm Shoulder to elbow = 1.5 heads tall. Lower Arm Lower Arm Elbow to wrist = 1.5 heads tall. Hand Hand The hand = 0.75 heads tall. Upper Leg Upper Leg Hip to knee = 2 heads tall. Lower Leg Lower Leg Knee to ankle = 2 heads tall.
Challenge #1 Make your own figure and give it an action! Try creating dynamic poses. Experiment with actions like jumping, reaching, running, balancing on one leg, leaning on a wall, crouching, or sitting. You can try the pose yourself or ask a friend to model. Observe how the body compensates to stay balanced.
Challenge #2 Play with proportion to create character frames for different builds. Widen or Narrow: Widen or Narrow: Adjust the width of the shoulders, hips, or waist to create more robust or leaner figures. Shorten or Lengthen: Shorten or Lengthen: Change the length of the torso or legs to create shorter or taller figures. Alter Limb Proportion Alter Limb Proportion: Adjust the length of arms and legs to create different builds, from more athletic to more compact figures. Experiment with shape: Experiment with shape: Play with shapes and balance in the figure. See how changing the proportions in unexpected ways can create unique character designs.
Challenge #3 Add outlines or silhouettes to some of your character frames. Start by defining the muscles and body shape, as they provide structure and volume to your character. Enhance your figure with details like hair, clothing, and accessories. Consider how these elements can reveal the character s profession, personality, or style. Envisioning your character in a specific setting or scenario will help you add details that make them more vivid and engaging.
Keep practicing, experimenting, and refining your skills. The more you work with proportions, the more confident and skilled you ll become! Proportion in Practice