Q-Switched Laser Treatment Guidelines for Skin Toning and Soft Peel Procedures
Learn the step-by-step procedures for Q-switched laser treatments including skin toning and soft peel techniques. Understand the pre-procedure preparation, treatment guidelines, and post-treatment care to achieve optimal results for skin rejuvenation.

Download Presentation

Please find below an Image/Link to download the presentation.
The content on the website is provided AS IS for your information and personal use only. It may not be sold, licensed, or shared on other websites without obtaining consent from the author. If you encounter any issues during the download, it is possible that the publisher has removed the file from their server.
You are allowed to download the files provided on this website for personal or commercial use, subject to the condition that they are used lawfully. All files are the property of their respective owners.
The content on the website is provided AS IS for your information and personal use only. It may not be sold, licensed, or shared on other websites without obtaining consent from the author.
E N D
Presentation Transcript
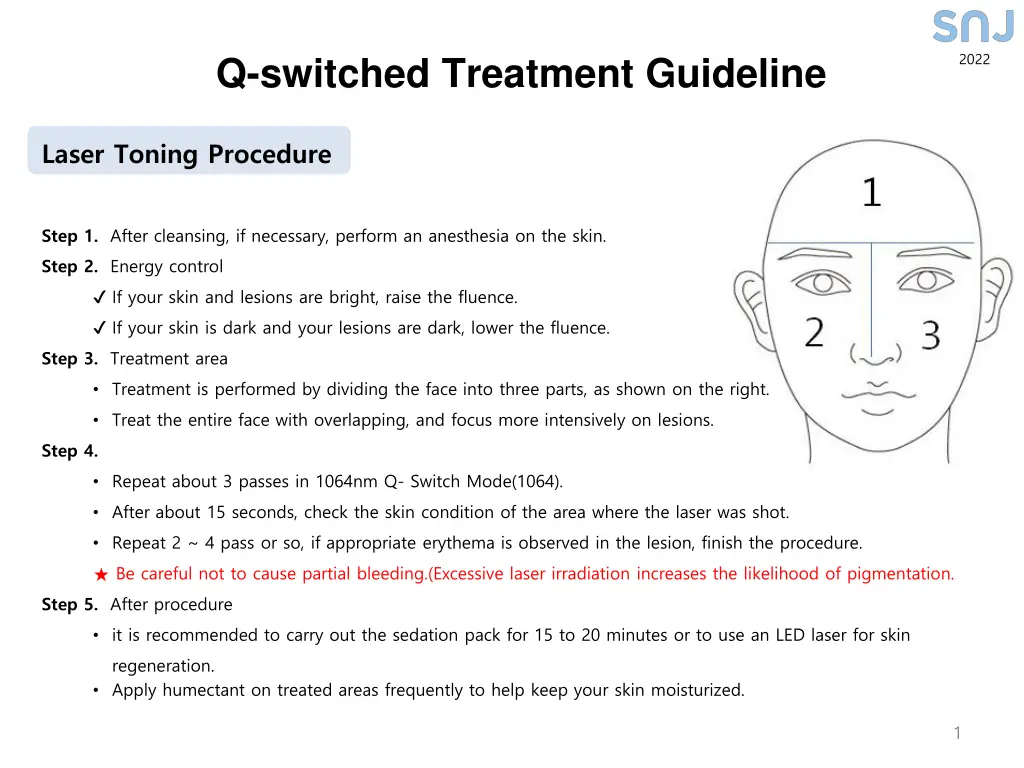
2022 Q-switched Treatment Guideline Laser Toning Procedure Step 1. After cleansing, if necessary, perform an anesthesia on the skin. Step 2. Energy control If your skin and lesions are bright, raise the fluence. If your skin is dark and your lesions are dark, lower the fluence. Step 3. Treatment area Treatment is performed by dividing the face into three parts, as shown on the right. Treat the entire face with overlapping, and focus more intensively on lesions. Step 4. Repeat about 3 passes in 1064nm Q- Switch Mode(1064). After about 15 seconds, check the skin condition of the area where the laser was shot. Repeat 2 ~ 4 pass or so, if appropriate erythema is observed in the lesion, finish the procedure. Be careful not to cause partial bleeding.(Excessive laser irradiation increases the likelihood of pigmentation. Step 5. After procedure it is recommended to carry out the sedation pack for 15 to 20 minutes or to use an LED laser for skin regeneration. Apply humectant on treated areas frequently to help keep your skin moisturized. 1
Q-switched Treatment Guideline Laser Toning After Procedure It is carried out at intervals of one week. After 3 to 4 times, you feel a slight improvement, and after 7 to 8 times, you notice that your skin is noticeably improved After skin improvement, apply toning treatment every 1 to 2 months to maintain effectiveness. Laser Toning procedure cautions It is recommended that the procedure be performed with an overlap of 50 ~ 60%. When treating the eyes and cheekbones, if the skin is thin and red, reduce the number of repetitions. Patients with high pigment levels should generally be treated with low energy. Patients with thicker pigment during treatment should stop the procedure, administer whitening, and reapply after one week. 2
Q-switched Treatment Guideline Soft Peel Procedure Step 1. Before the procedure, please cleanse and remove the waste in the skin. * Exfoliation before the procedure can increase the treatment effect. Step 2. Apply carbon I. II. III. Use a gauze or a brush to apply carbon thinly and uniformly to the treatment site. After applying the carbon, wait about 10~15 minutes to attach the carbon to the skin. Cover the eyebrows of the patient with a cotton swab or gauze. Step 3. After about 10 minutes, if the carbon is properly absorbed into the skin, use dry gauze to wipe off the proper amount of carbon. * It is a process to apply Carbon thinly and uniformly. If the concentration is too dark, it reacts strongly. Step 4. Shoot the laser. I. Set the energy in 1064nm mode . II. It is recommended that the procedure be performed with an overlap of 50%. III. As the carbon particles fly away, it removes the dead skin and promotes cellular renewal of the epidermis and dermis. Step 5. After procedure it is recommended to carry out the sedation pack for 15 to 20 minutes or to use an LED laser for skin regeneration. Apply humectant on treated areas frequently to help keep your skin moisturized. 3
Q-switched Treatment Guideline Before epidermal lesion procedure Avoid tanning before laser procedure. Hairy areas are shaved and treated. Do not take photosensitized drugs. Before applying the anesthetic cream, wipe the skin of the treatment area with alcohol cotton. Apply anesthetic cream 30 minutes before the procedure. After epidermal lesion procedure After the procedure, apply antibiotic ointment every morning and evening until the scab is removed. After the procedure, flushing and swelling are observed at the site of treatment, and a scab is developed after 3 to 5 days. If you forcefully remove the scab, it may cause pigmentation or scarring, so you should wait until it falls off by itself. For prevention and treatment of PIH, apply sunscreen during the day and apply hydroquinone in the evening if needed. 4
Q-switched Treatment Guideline End Point 532nm Epidermal lesion(age spot, freckle, blemish): mild whitening If the lesion is seen as mild whitening immediately after 1 shot, it is an appropriate ending point. * To prevent PIH and Bulla, do not repeatedly penetrate the same area with laser. (Mild whitening) (Excessive reaction) 1064nm Dermal lesion a. Nevus of Ota: Frosting and petechiae It is a good ending point when some pinpoint bleeding occurs with frosting(gray) immediately after 2-3 shots. b. Liver spots: Mild Erythema It is a good ending point when some mild erythema occurs immediately after 2-3 shots. (Frosting pinpoint bleeding) (mild erythema) 5
Q-switched Treatment Guideline When using Zoom H.P, Please keep the distance (2-3 cm in distance from the lesion) Spot Size Fluence (j/ ) Pulse rate (Hz) Treatment Interval / Times Indication Mode pass End point Laser Toning Melasma PIH 1064 single 1.0~ 5~10 2~4 Mild erythema Period : 1~2weeks Times : 10 8 PDP can be applied to non-reactive pigments. PDP Toning PDP 1.8~ 5~10 2~4 Spot Size Fluence (j/ ) Pulse rate (Hz) Treatment Interval /Time Indication Mode pass End point Freckle /Blemish 532 single Period : 4~6weeks Times : 1~2tiems 2~3 0.4~0.9 1 1 Mild whitening 532 single Period : 4~6weeks Times : 1~2times Age spot 2~3 0.5~0.7 1 1 Mild whitening Epidermis Cafe au lait spot 532 single Period : 4~6weeks Times : 2~3times 2~3 0.5~0.7 1 1~2 Mild whitening 532 single Period : 4~6weeks Times : over3 times Nevus 2~3 1.2~ 1 1 Mild whitening Becker s Nevus 1064 single Period : 4~6weeks Times : over6 times 3 4.5~ 1~2 1~2 Mild erythema 1064 single Period : 4~6weeks Times : over6 times Dermis Blue Nevus 2 18.0~ 1~2 1~2 Mild erythema 1064 single Period : 4~6weeks Times : 5~10 times Ota Nevus 4 4.5~ 1 1 frosting/petechia * Ota Navus As the number of treatments increases, the color of the lesions becomes lighter and there are fewer pigments that absorb laser light, so reduce the flow (j/cm2) gradually. 6
Q-switched Treatment Guideline Fluence (j/ ) Treatment Interval / Times Indication Mode Spot Size Hz pass End point 1064 Quasi Genesis 6 10.2 5~10 2~4 pass Interval : 1~2 weeks Treatment is performed on a regular basis, depending on the condition of the face. Mild erythema After removing 1 pass carbon, apply 2 to 3 passes 1064 single Soft Peeling 8 0.8~1.3 5~10 Interval : 3~5weeks Treatment is performed on a regular basis, depending on the condition of the face. Don't overlap as much as possible. It starts with a large spot size and low energy setting. and reduce smaller spot size and increase energy from the next session. 8 1.8~3.18 Immediate End Point : Frosting Tattoo (black, blue) 1064 single 1 1~2 pass End point after 10 minutes : Petechiae 6 2~4 3~4 3~6 Fluence(j/ ) Indication Mode Spot Size Hz Repeatation pass Hand piece 10 0.8~1 MLA ZOOM Regeneration Pore Scar If the symptoms are severe, stacking is performed up to 3 times. After 1 minute and 30 seconds, petechiae can be observed. 1064 single 7 0.88 ~ 1 1~5 5 1 pass 4 0.87 ~ 1
Long pulsed Treatment Guideline Spot Size (mm) On Time (ms) Fluence (J/cm2) Frequency (Hz) Indication Handpiece Treatmaent Guide 6 0.3 10.6~ 10 5 0.5 10 ~ 15.2 5 ~ 10 1~2weeks 2~3pass genesis 0.91 ~ 20.8 3~4 Erythema 7 5 For skin type 3 or higher, lower the fluence slightly 10 30 ~ 50 19.7 ~ 25.4 1 3~4 weeks 2~3pass Tightening & Lifting 10 40 ~ 50 28 ~ 50.9 1 Zoom 8 0.3 5.5~6.5 5-10 When irradiated on a spot that has just been scarred, it turns purple, but since this reaction is a strong reaction, do not overlap. Inflamed areas are treated in 2-3 passes. 2~4weeks 1~3pass Active Acne Because it is a parameter that can be hair removal, avoid hairy areas. 8 20 10~20 2~3 Irradiate after extraction or Triam Injection Spot Size (mm) On Time (ms) Fluence (J/cm2) Frequency (Hz) Indication Skin Type Handpiece Treatment Guide V Zoom 10 1 16-18 1 ~ 2 1pass overlap 18% Dark Skin Type VI Zoom 10 1 14-16 1 ~ 2 Light Zoom 10 10 ~ 20 30 ~ 40 1 ~ 2 Hair Fine Hair Removal Interval : 4~6weeks No overlapping Air cooling Topical Anesthesia Dark Zoom 10 20 ~ 30 40 ~ 50 1 Light Zoom 10 30 ~ 40 20 ~ 30 1 Thick Hair Dark Zoom 10 40 ~ 60 30 ~ 40 1
Long pulsed Treatment Guideline Spot Size (mm) On Time (ms) Fluence (J/cm2) Frequency (Hz) Indication Handpiece Treatment Guide Strong Erythema Air cooling Post cooling required Flush Zoom 5 0.5 10 ~ 15 5 ~ 10 (Acne Erythema) No Overlapping Interval : 4~8 weeks Air Cooling Topical Anesthesia Telangiectasia Zoom 2 ~ 3 5 160 ~ 180 1 Vascular Lesions Low and Thin Blood Vessel Fluence : Up Pulse width : Down Zoom 3~4 1 ~ 5 100 ~ 180 1 In the case of Long Pulse, the laser penetration depth is deep and there is a possibility of scarring, so it should be used with caution. In particular, deep lesions in the mucous membrane may cause nerve damage and hemorrhage, so you should be especially careful. In the case of Varicose Vein, since the blood vessel wall is tough and thick, the pulse width is longer and the fluence is higher than facial treatment. Because strong energy is used, Additional Pre, Post-Cooling are essential. 9