Retiree Benefit Elections Process Guide
This guide outlines steps for retirees to change benefit elections after initiating a qualifying Life Event approval from DBM EBD. It covers viewing and managing benefit categories, selecting plans, adding/removing dependents, and addressing data issues.

Download Presentation

Please find below an Image/Link to download the presentation.
The content on the website is provided AS IS for your information and personal use only. It may not be sold, licensed, or shared on other websites without obtaining consent from the author.If you encounter any issues during the download, it is possible that the publisher has removed the file from their server.
You are allowed to download the files provided on this website for personal or commercial use, subject to the condition that they are used lawfully. All files are the property of their respective owners.
The content on the website is provided AS IS for your information and personal use only. It may not be sold, licensed, or shared on other websites without obtaining consent from the author.
E N D
Presentation Transcript
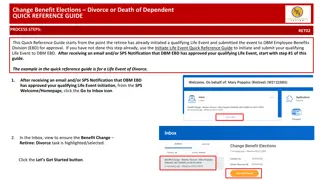
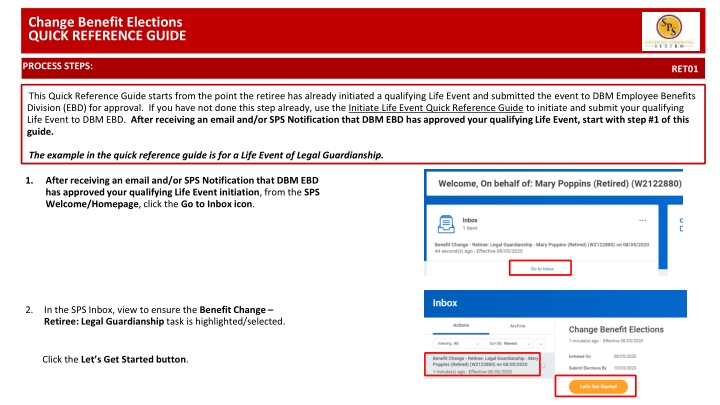
Change Benefit Elections Initiate Life Event Change Dependent Care FSA QUICK REFERENCE GUIDE QUICK REFERENCE GUIDE PROCESS STEPS: RET01 This Quick Reference Guide starts from the point the retiree has already initiated a qualifying Life Event and submitted the event to DBM Employee Benefits Division (EBD) for approval. If you have not done this step already, use the Initiate Life Event Quick Reference Guide to initiate and submit your qualifying Life Event to DBM EBD. After receiving an email and/or SPS Notification that DBM EBD has approved your qualifying Life Event, start with step #1 of this guide. The example in the quick reference guide is for a Life Event of Legal Guardianship. 1. After receiving an email and/or SPS Notification that DBM EBD has approved your qualifying Life Event initiation, from the SPS Welcome/Homepage, click the Go to Inbox icon. 2. In the SPS Inbox, view to ensure the Benefit Change Retiree: Legal Guardianshiptask is highlighted/selected. Click the Let s Get Started button.
Change Benefit Elections Initiate Life Event Change Dependent Care FSA QUICK REFERENCE GUIDE QUICK REFERENCE GUIDE PROCESS STEPS: RET01 3. On the Enrollment Page you will see tiles for each category/coverage type. The benefit elections are listed by category: Medical, Prescription, Dental and Life Insurance. All current elections will display. You can select the Manageor Enroll button for each category to enroll or make changes to current elections. A Managebutton indicates a current enrollment in this category An Enroll button indicates coverage is waived in this category
Change Benefit Elections QUICK REFERENCE GUIDE Initiate Life Event Change Dependent Care FSA QUICK REFERENCE GUIDE PROCESS STEPS: RET01 4. In this example, we will click the Manage button in the Medical category. By clicking the Manage button the system will open up the Medical selections where you have options to select a Medical plan, change your Medical plan, Waive Medical coverage and add or remove a dependent. 5. Click the Select button for the plan which you want to elect. Note that you will only be able to select one of the plans. If you want to drop/remove coverage, click the Waive button. On this page you are selecting your Medical plan. After selecting the plan you will have the option to add or remove dependents on the next page. 6. Click the Confirm and Continue button the dependents to be added or removed from the plan, if applicable. You will not see the Dependents page if you selected to Waive coverage but still must click the Confirm and Continue button. to to continue to select
Change Benefit Elections QUICK REFERENCE GUIDE Initiate Life Event Change Dependent Care FSA QUICK REFERENCE GUIDE PROCESS STEPS: RET01 7. On the Dependents page, check or uncheck the box next to each dependent you want to add or remove from the plan. When the Select box is checked, the dependent will be covered in the plan. If you want to add a new dependent that does not appear on the page, click the Add New Dependent button and follow the instructions for step # s 9 through 16. If you see an issue with one of your current or newly added dependents (i.e., Typo in Name or Date of Birth, Relationship, etc.) DO NOT add a new dependent. Proceed with elections with the current dependent and contact DBM Employee Benefits Division (EBD) with the dependent data issue; they will assist with correcting the data. 8. If you do not need to add a new dependent, click the button and proceed to step #17.
Change Benefit Elections QUICK REFERENCE GUIDE Initiate Life Event Change Dependent Care FSA QUICK REFERENCE GUIDE PROCESS STEPS: RET01 9. On the Add My Dependent From Enrollment page, you will see the REQUIRED supporting documentation for each dependent type. After reviewing the information, click t to proceed to add the dependent.
Change Benefit Elections QUICK REFERENCE GUIDE Initiate Life Event Change Dependent Care FSA QUICK REFERENCE GUIDE PROCESS STEPS: RET01 10. On the Add My Dependent from Enrollment page, complete the following data for the new dependent: First Name Last Name Relationship Date of Birth Gender 11. Scroll down to the page to National IDs section. Click the Add button to open the section to complete.
Change Benefit Elections QUICK REFERENCE GUIDE Initiate Life Event Change Dependent Care FSA QUICK REFERENCE GUIDE PROCESS STEPS: RET01 12. On the National IDs page, complete the following data for the new dependent: Country National ID Type Identification # Click the Search symbol in the field to select a valid value. If after clicking the Add button you realize you do not have all of the data required, you must click the Remove button to close the National IDs page.
Change Benefit Elections QUICK REFERENCE GUIDE Initiate Life Event Change Dependent Care FSA QUICK REFERENCE GUIDE PROCESS STEPS: RET01 13. Scroll down to the Address section. The dependent address will default to your address in the system. If the dependent lives at your address, you do not need to update anything. If the dependent DOES NOT LIVE at your address, you need to: Click on the X in the Use Existing Address field to remove your address as the default. Then complete the Address, City, State and Postal Code fields with the dependent address. 14. After completing and reviewing the new dependent data for accuracy, click on the Save button to proceed.
Change Benefit Elections QUICK REFERENCE GUIDE Initiate Life Event Change Dependent Care FSA QUICK REFERENCE GUIDE PROCESS STEPS: RET01 15. You will now see the new dependent has been added to the category/coverage type. The new dependent has only been added to this category/coverage type. If you want this dependent covered for other categories/coverage types you will need to Select the dependent on the Dependents page for each category/coverage type desired. 16. Click on the Save button to proceed.
Change Benefit Elections Initiate Life Event Change Dependent Care FSA QUICK REFERENCE GUIDE QUICK REFERENCE GUIDE PROCESS STEPS: RET01 17. After clicking the Save button, you will be returned to the Enrollment page. The system will display a message stating your changes have been updated. You can now perform the same steps to make election and/or dependent changes to the remaining categories/coverage types (Prescription, Dental and Life Insurance), if desired. 18. After reviewing and updating elections for all categories, click the Review and Sign button to proceed.
Change Benefit Elections QUICK REFERENCE GUIDE Initiate Life Event Change Dependent Care FSA QUICK REFERENCE GUIDE PROCESS STEPS: RET01 19. On the View Summary page, do a final review of the Selected and Waived benefits. Verify the Plans selected are accurate Verify all dependents you want covered for each Plan are listed in the Dependents column next to the Plan If you identify an error click your browser back button and you will return to the Enrollment page. NOTE: The total monthly cost displayed at the top right corner of the screen and the monthly cost displayed next to each plan will not reflect your actual costs for retirees receiving partial subsidy. After the event is approved, the DBM Employee Benefits Division will mail you a Confirmation Statement that will display your individual costs based on the subsidy you receive. 20. In the Attachments sections, you MUST attach required supporting documentation if you have added a new dependent(s). If you have not added any new dependent(s), no attachment/documentation is required. To attach a document(s), click the Select Files button and then browse to find the files that need to be uploaded, select and attach. Note that LEGIBLE photos of documents are acceptable. Use the Upload button to attach more than one document.
Change Benefit Elections QUICK REFERENCE GUIDE Initiate Life Event Change Dependent Care FSA QUICK REFERENCE GUIDE PROCESS STEPS: RET01 21. Scroll down the page to the Electronic Signature section. Read the Electronic Signature section. 22. After reading the Electronic Signature section. Click the I Accept checkbox to certify your elections and click the Submit button.
Change Benefit Elections Initiate Life Event Change Dependent Care FSA QUICK REFERENCE GUIDE QUICK REFERENCE GUIDE PROCESS STEPS: RET01 23. On the Submitted page you will get a message that you have enrolled in benefit elections with the option to print a copy of your elections. Click on the View Benefits Statement button. 24. On the Submit Elections Confirmation page, click the Print button. NOTE: The total monthly cost displayed on the printed statement will not reflect your actual costs for retirees receiving partial subsidy. After the event is approved, the DBM Employee Benefits Division will mail you a Confirmation Statement that will display your individual costs based on the subsidy you receive.
Change Benefit Elections Initiate Life Event Change Dependent Care FSA QUICK REFERENCE GUIDE QUICK REFERENCE GUIDE PROCESS STEPS: RET01 25. Your elections have now been submitted to DBM Employee Benefits Division (EBD) for review and approval. Your elections will not go into effect until DBM EBD has completed the review/approval. If there are any issues or questions, DBM EBD will return your event to you. If your event is returned, you will receive a Notification in your SPS Notifications. When your event is approved, you will receive a Notification in your SPS Notifications and a DBM Confirmation Statement will be mailed to your home address in the SPS system. If you have a Work email address in SPS you will also receive an email Notification at the Work email address. If you do not have a Work email address in SPS, you will receive the notification at your Personal email address.