Safe-Stop Robots Supplies and Assembly Instructions
Learn how to create Safe-Stop robots using yogurt cups, copper tape, wires, motors, batteries, and foam tape. Follow step-by-step instructions with images to assemble the robot and create a board for testing. Engage students in a fun robotics project with this educational guide.

Download Presentation

Please find below an Image/Link to download the presentation.
The content on the website is provided AS IS for your information and personal use only. It may not be sold, licensed, or shared on other websites without obtaining consent from the author. If you encounter any issues during the download, it is possible that the publisher has removed the file from their server.
You are allowed to download the files provided on this website for personal or commercial use, subject to the condition that they are used lawfully. All files are the property of their respective owners.
The content on the website is provided AS IS for your information and personal use only. It may not be sold, licensed, or shared on other websites without obtaining consent from the author.
E N D
Presentation Transcript
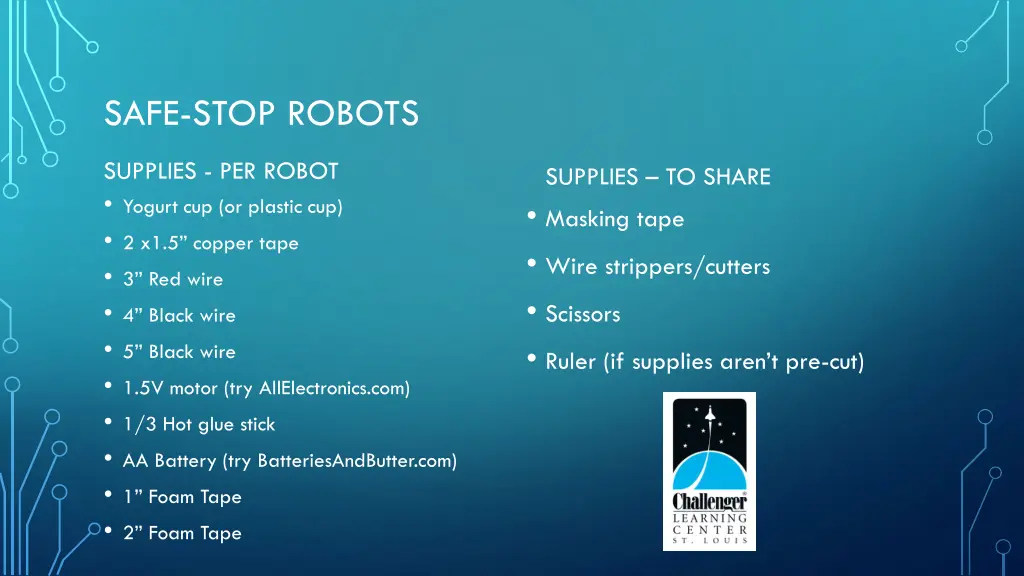
SAFE-STOP ROBOTS SUPPLIES - PER ROBOT Yogurt cup (or plastic cup) 2 x1.5 copper tape 3 Red wire 4 Black wire 5 Black wire 1.5V motor (try AllElectronics.com) 1/3 Hot glue stick AA Battery (try BatteriesAndButter.com) 1 Foam Tape 2 Foam Tape SUPPLIES TO SHARE Masking tape Wire strippers/cutters Scissors Ruler (if supplies aren t pre-cut)
1. CUT WIRES & STRIP - INCH FROM EACH END Save 2 of the stripped rubber stubs! 3 Red wire 4 Black wire 5 Black wire 2. POKE MOTOR SHAFT THROUGH GLUE STICK SEGMENT, OFF CENTER
4. ATTACH COPPER TAPE TO BOTH SIDES OF CUP USING RUBBER NUBS TO RAISE COPPER ABOVE RIM Keep ~1 along outside, to tape wires to later (CUT-AWAY VIEW)
3. PUT RED WIRE THROUGH RIGHT TAB, AND 5 BLACK WIRE THROUGH LEFT TAB Keeping colors consistent makes it easier to troubleshoot students projects.
5. USE FOAM TAPE TO ATTACH BATTERY AND MOTOR TO CUP IN A T SHAPE Use ~1 for motor Use ~2 for battery Put positive side to right Ensure glue tick has clearance (BIRD S EYE VIEW CUP UPSIDE-DOWN)
6. TAPE ATTACH RED WIRE TO POSITIVE SIDE OF BATTERY, AND SHORT (4 ) BLACK WIRE TO NEGATIVE SIDE (BIRD S EYE VIEW CUP UPSIDE-DOWN)
7. TAPE SHORT BLACK WIRE TO COPPER TAPE ON LEFT, AND TAPE LONG BLACK WIRE TO COPPER TAPE ON RIGHT We tape the wire to the non- adhesive side of the copper tape because it conduct electricity better. (BIRD S EYE VIEW CUP UPSIDE-DOWN)
8: CREATE BOARD FOR ROBOT Use foam board, poster board, or two pieces of card stock taped together. Tape aluminum foil on Optional: Make split between two sides, and have students explain why the robot won t move, even if both sides are touching metal.