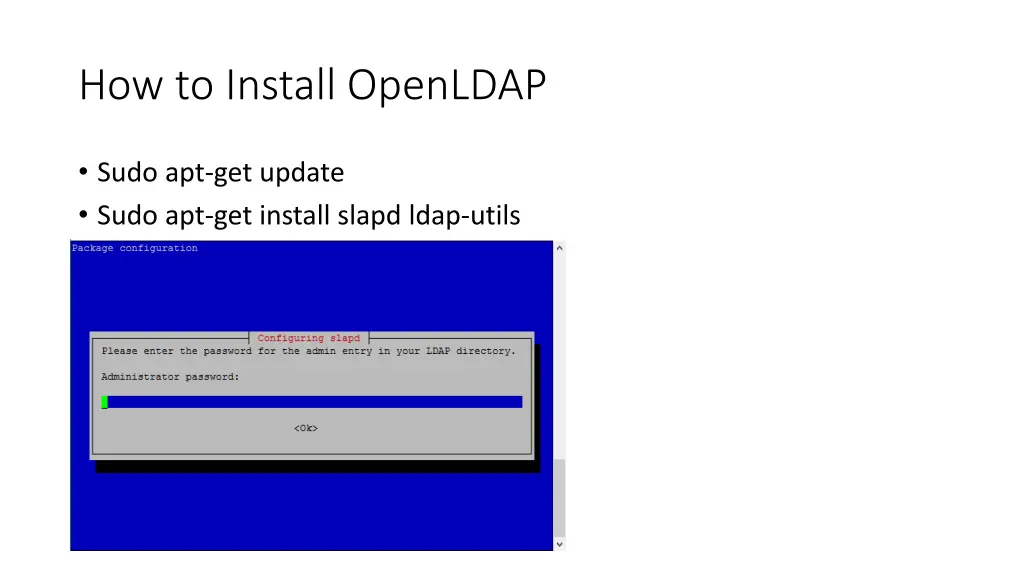
Learn how to install OpenLDAP on your system using apt-get, configure the OpenLDAP server, create base and person LDIF files, and upload them to LDAP. Follow detailed instructions with images to set up your LDAP environment successfully.
Please find below an Image/Link to download the presentation.
The content on the website is provided AS IS for your information and personal use only. It may not be sold, licensed, or shared on other websites without obtaining consent from the author. If you encounter any issues during the download, it is possible that the publisher has removed the file from their server.
You are allowed to download the files provided on this website for personal or commercial use, subject to the condition that they are used lawfully. All files are the property of their respective owners.
The content on the website is provided AS IS for your information and personal use only. It may not be sold, licensed, or shared on other websites without obtaining consent from the author.
Reconfiguring OpenLDAP Continue Start your Openldap Database and ensure It is working with commands as below. sudo systemctl start slapd sudo ps -ef | grep slapd
Creating a base Ldif file Create a file with content below for your base directory structure. Vi base.ldif dn: ou=Groups,dc=sse,dc=ws,dc=afnog,dc=org ou: Groups objectClass: top objectClass: organizationalUnit dn: ou=Users,dc=sse,dc=ws,dc=afnog,dc=org ou: Users objectClass: top objectClass: organizationalUnit
Upload your base LDIF file to LDAP Run the command below to upload your base ldif file into the LDAP server ldapadd -x -W -D "cn=admin,dc=sse,dc=ws,dc=afnog,dc=org" -f base.ldif Supplied your LDAP password and you should see feedback as below
Creating a person Ldif file Create a file with content below for your base directory structure. Vi person.ldif dn: cn=frank,ou=Groups,dc=sse,dc=ws,dc=afnog,dc=org cn: frank gidNumber: 5001 objectClass: posixGroup dn: uid=frank,ou=Users,dc=sse,dc=ws,dc=afnog,dc=org uid: frank uidNumber: 5001 gidNumber: 5001 cn: Frank Kuse sn: Kuse objectClass: posixAccount objectClass: organizationalPerson loginShell: /bin/bash homeDirectory: /home/frank
Upload your person LDIF file to LDAP Run the command below to upload your base ldif file into the LDAP server ldapadd -x -W -D "cn=admin,dc=sse,dc=ws,dc=afnog,dc=org" -f person.ldif Supplied your LDAP password and you should see feedback as below
Setting up user credentials Run the command below create a password for the user account created. sudo ldappasswd -s afnog123 -W -D "cn=admin,dc=sse,dc=ws,dc=afnog,dc=org" -x "uid=frank,ou=Users,dc=sse,dc=ws,dc=afnog,dc=org" Supplied your LDAP password and you should see feedback as below
Check your LDAP directory structure Run the command below to check your uploaded ldif files forming your LDAP directory structurein your database. Sudo slapcat You should see entire OpenLdap database with example as below.