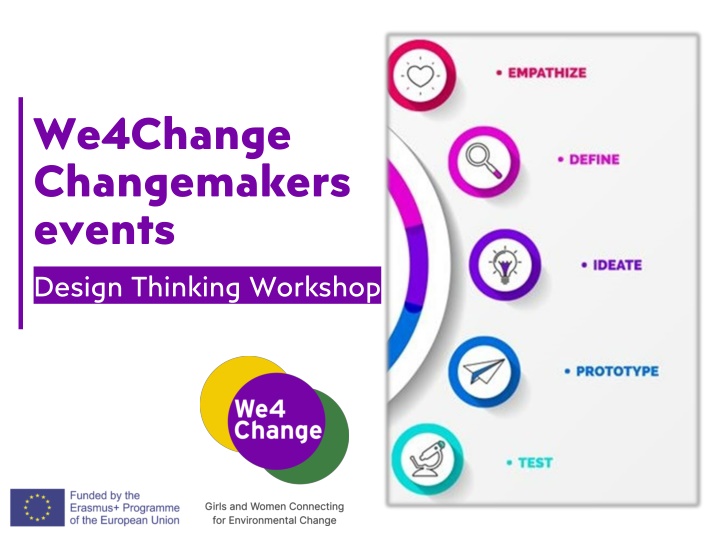
Design thinking is a human-centered, collaborative, optimistic, and experimental approach used to understand users, challenge assumptions, and create innovative solutions. Originating in the business sector, it has spread to various domains like social innovation and education, empowering individuals to problem-solve, foster teamwork, and drive innovation. The process involves stages like empathy, defining the problem, ideation, prototyping, and testing, all aimed at transforming challenges into opportunities.
Please find below an Image/Link to download the presentation.
The content on the website is provided AS IS for your information and personal use only. It may not be sold, licensed, or shared on other websites without obtaining consent from the author. If you encounter any issues during the download, it is possible that the publisher has removed the file from their server.
You are allowed to download the files provided on this website for personal or commercial use, subject to the condition that they are used lawfully. All files are the property of their respective owners.
The content on the website is provided AS IS for your information and personal use only. It may not be sold, licensed, or shared on other websites without obtaining consent from the author.
Workshop Schedule 25 minutes (approx.) Welcome, introduction about the workshop and its objectives, introduction to Social Innovation (SI), Social Innovation in Education (SIE), Design Thinking (DT) approach and the practical activities (Slides 3-12) 2 hours and 5 minutes (approx. 125 minutes) Applying the DT approach through 5 planned activities under specific steps (slides 13- 23) Note: Suggested duration for each practical activity with DT steps: 25 minutes (approx.), so estimated total duration of the workshop: 150 minutes. Closing of the workshop !
What is Design Thinking? A non-linear, iterative process that teams use to understand users, challenge assumptions, redefine problems and create innovative solutions to prototype and test DT requires team-work and the focus is solutions that centred, but the process itself is deeply human. not are only human- on
Did you know what characteristics DT entails as an approach? Human-centered: begins from deep empathy and understanding of needs and motivations of people Collaborative: it benefits greatly from the views of multiple perspectives Optimistic: we all can create a change no matter how big a problem, how little time or how small a budget Experimental: designers can learn from their mistakes, because they come up with new ideas, get feedback on them and then iterate Source: IDEO (2013)
Origins of Design Thinking and assets First applied in the business sector to increase innovation and competitiveness. Due to its human centred approach, it was transferred and applied next in multiple contexts (e.g., the social innovation domain, educational area). Why Design thinking? It gives us faith in our creative abilities for transforming difficult challenges into opportunities for design. It helps us understanding human needs and motivations. It can be applied to all areas and fields, so a DT workshop/ activity can therefore be useful for everyone. It teaches people how to problem-solve: a DT activity teaches problem solving in action, giving participants tool which can be applied to almost any challenge and in any examined area. It fosters innovation and teamwork: The very essence of Design Thinking lies in its collaborative vision and outside the box thinking Source: https://careerfoundry.com/en/blog/ux-design/design-thinking-workshop/
The Hasso Plattner Institute of Design at Stanford (aka the d.school) describes design thinking as a five-stage process. Note: These stages are not always sequential, and teams often run them in parallel, out of order and repeat them in an iterative fashion. Source: http://steamcurriculum.we ebly.com/design- thinking.html
Activities for the Design Thinking Activities for the Design Thinking workshop (practical part) workshop (practical part) The proposed activities (next slides) are broken down in five steps: Empathize, Define, Iterate, Prototype, and Test. Even though the phases are not necessarily linear, and a certain degree of iteration is at least encouraged, the steps for this workshop are presented and analysed in a sequential way for reasons of simplicity. Total duration of the practical activities: 125 minutes (25 minutes per activity/ DT step).
Activity 1: Understand the users, their needs, and concerns Empathy is the cornerstone of any successful design project. The extent to which you understand and empathize with your users ultimately determines the outcome of your design! Aim: to navigate participants to understand the users needs and personal perspectives within the context of their design challenge. Objectives Note: Given that there are 3 different thematic areas , the user s needs will naturally differ across the area of clean energy, smart cities/mobility, and sustainable consumption. Division of participants in small groups Preparation & material Papers and pens for collecting ideas through brainstorming Recommended time 25 minutes Participants will first be divided into small groups of roughly 3-4 persons each. The aim is to perform small brainstorming sessions or among participants, during which participants will be asked to discuss and contemplate on the needs of their community. Practical instructions Internet connection to perform online research (since the idea to arrange an interview with the user seems too challenging to perform it given the specific time slot)
Activity 2: Collectively discover the true problem ! The Define phase, which follows empathy, involves in principle synthesizing findings in order to identify and articulate an approach to the challenge. Objectives The define stage is dedicated to defining the problem: What user problem will you be trying to solve? In other words, what is your design challenge ? Useful materials for this step: Preparation & material A4 papers (for taking notes and collect all the information accumulated in the empathy stage), a whiteboard with sticky notes, marker pens, post-it notes. In the case of a virtual workshop, the same handy platform, such as Jamboard, can be deployed. Recommended time 25 minutes 1st step: participants will be asked to think about and write down in a paper or a virtual whiteboard their thoughts and insights about the following: User: Who are you designing for? Need: What does this user need? Insight: What surprised you about this user? What do you notice that nobody else notices? Practical instructions Participants will be given around 10 minutes to individually express their ideas. 2nd step: another 15-minutes brainstorming session will follow where the core ideas will be discussed and merged into a single problem statement. A rule of thumb: participants should focus on the user sreal emotional needs. This means that it is not necessary from now to jump to proper solutions, but mostly to grasp the essence of the problem.
Step 3: Ideate Generate ideas and potential solutions!
Activity 3: Time for idea generation! The goal of this activity is to encourage and support girls and young women to start thinking of how to solve the problem they ve researched and defined. In principle, the ideate phase is when team members focus on the generation of creative solutions. Rule here: quantity and diversity of ideas, not sticking to a theoretically best solution (participants should come with as many and as different solutions as possible) Objectives Important reminder: All steps of design thinking process should be combined by creativity and teamworking, so exploring options and generating a wide variety of ideas is essential to arrive at a genuinely creative solution. A big board is needed. The overall size of the board is essential to add and display as many ideas as possible. The ideas will be written down directly in the board with a pen or posted in sticky notes (post-it notes). For virtual workshops: a platform like Jamboard, Miro or Mural can be used as alternative. Preparation & material It is advisable that participants be kept in the same groups to ensure continuity with the previous steps. For the evaluation phase of the suggested ideas, a simple pen is needed to write down on the board the results. 25 minutes Recommended time In the beginning, participants will be asked by the trainer to start brainstorming and suggest as many creative ideas as they can think. The whole process should last approximately 10 . This is the creativity stage, where participants must feel unconstrained and just express freely themselves. Upon completion of the brainstorming, participants will evaluate each idea according to following criteria: (i) feasibility of idea, (ii) cost-effectiveness of idea, and (iii) how rational the idea is, (iv) originality of idea. This is the stage where ideas are carefully reconsidered collectively. For each idea, participants can assign points for each criterion, through a process of open voting: 1 if the idea scores very poor for that criterion, and 5 if it scores very well. This method will facilitate the process showcasing which idea(s) should become prototyped solutions (15 ). Practical instructions
Activity 4: The moment for the solutions prototype! The central objectives of this phase are: to start creating draft and low-resolution prototypes of the selected solution(s) that were ideated during the ideation step. Objectives to give substance to the suggested solutions through a creative process, where girls and women use simple materials to embody the ideas. A prototype is nothing more than an artifact that serves as draft miniature of the solution. This phase is the most demanding in terms of materials. Due preparation and provision of materials to participants is of outmost importance. However, the process can be kept simple and budget-friendly. For physical workshops: Cardboard/paperboard, scissor, markers, sticky tapes, plasticine, lego bricks, glue stick, colored construction papers, pens, big table(s) and anything else that is considered necessary for carrying out the phase. Preparation & material For online workshops: PowerPoint programme, Mural, Microsoft paint programme. Recommended time 25 minutes 1)Participants will be divided in three groups (of 4 persons). Each group will be responsible to create a prototype of the corresponding two or three most popular ideas that have been selected in Step 3 (Ideate). 2) Each group will be given a maximum of 20- 25 minutes to design and create its prototype. In a physical event: each group will work on its own table, and groups should be distanced from each other for better concentration. In a virtual event: participants will be divided into break-out rooms and work on a common space platform. Note: If the choice of creating a model or an artifact seems to be too much complex or challenging, there are alternatives of achieving the expected outcome instead of a model s creation: 1) create a diagram (mapping of the structure, process and network of participants idea); 2) Create a storyboard: i) Visualize the complete experience of your idea over time through a series of images, sketches, cartoons or even just text blocks; ii) Use Post-it Notes or individual sheets of paper to create the storyboard so you can rearrange their order. Practical instructions
Step 5: Test Testing your prototypes and gather feedback!
Activity 5: The testing phase: another chance to understand the user! Testing phase: the action of requesting feedback about the prototypes that were created. It gives them another opportunity to gain empathy for the people they are designing for. bjectives: (i) to refine prototypes and solutions, (ii) to learn more about their user, (iii) to refine their point of view. Objectives A rule of thumb: the final stage of design thinking is not necessarily the last thing designers will do. Remember: design thinking is an iterative process, where designers are expected to go through a series of changes, edits, and refinements. Pens, pencils, and notebooks for writing down thoughts and collecting feedback Colored post-in notes Preparation & material *In case that upon reflection participants should return to a previous phase, the same materials that correspond to that phase can be used. Recommended time 25 minutes The process will unfold as follows: 1) The previous groups will present to each other their prototypes and afterwards they will critically provide feedback as if they were the users (under a hypothetical scenario). Participants in one group will take over the role of the design thinkers and the second group will act as the target group/users of the problem s solution. The designers team will make a brief presentation of the prototypes(s) they prepared in the previous step (10 minutes). Practical instructions 2) Upon presentation, the users team will think of the proposed idea(s) and provide feedback either for the prototype or something related to previous steps (5 minutes). Suggestion: the design thinkers team can gather easily feedback from their users by asking them and reflecting upon these questions: What worked? Wat could be improved? Any further questions ? Any other ideas? 3) Once the presenting group receives the feedback, they can devote around 10 minutes to reflect on them and refine as many points and characteristics on their design challenge.
Sources- further material: IDEO (2013). Design Thinking toolkit for educators. Available at: https://f.hubspotusercontent30.net/hubfs/6474038/Design%20for%20Learning/IDEO_DTEdu_v 2_toolkit+workbook.pdf Interaction Design Foundation. (2021). What is Design Thinking and Why Is It So Popular? Available at: https://www.interaction-design.org/literature/article/what-is-design-thinking-and- why-is-it-so-popular & https://www.interaction-design.org/literature/topics/design-thinking Empathize step Stevens, E. (2021). What Is Empathy in Design Thinking? A Comprehensive Guide. Available at: https://careerfoundry.com/en/blog/ux-design/what-is-empathy-in-design- thinking / & QED42. How Empathy Works in Design Thinking. Retrieved from: https://www.qed42.com/blog/how-empathy-works-in-design-thinking Define step Stevens, E. (2021). Stage 2 in the Design Thinking Process: Define the Problem. Available at: https://careerfoundry.com/en/blog/ux-design/stage-two-design-thinking-define- the-problem/ Ideate step Career Foundry. (2021). What Is Ideation in Design Thinking? An Ideation Techniques Guide. Retrieved from: https://careerfoundry.com/en/blog/ux-design/what-is- ideation-in-design-thinking/ Prototype phase Interaction Design Foundation. (2021). Prototyping. Retrieved from: https://www.interaction-design.org/literature/topics/prototyping Testing phase Workshopper. (2021). Design Thinking Phase 5 - How to Test Effectively. Retrieved from: https://www.workshopper.com/post/design-thinking-phase-5-how-to-test- effectively Extra material: https://static1.squarespace.com/static/57c6b79629687fde090a0fdd/t/58ac891ae4fcb50f1fb2f1a b/1487702304601/Facilitator%27s+Guide_Design+Thinking.pdf https://www.fipp.com/news/using-design-thinking-to-drive-innovation/#
Thank you! Find more resources at http://we4change.eu/educational-resources/